Installing and using the CoGS card in an Apple II
Describes firmware 1.14 (9/20/2026). Manual revision 5, built 2026-09-20.
This manual describes the CoGS card running firmware 1.14 (9/20/2026). It covers installing the card in an Apple II, joining a network, booting and browsing disk images, playing audio, viewing pictures, using the card from GS/OS, keeping the firmware current, and solving problems.
It is written for anyone who owns a CoGS card. No programming knowledge is needed. Programmers who want the register map, the protocol, and the firmware internals should read the companion book, the CoGS Technical Reference.
Chapter 1, Read This First, is two pages on what the card is and what you need. Chapter 2, Quick Start, gets a card from the box to a running disk image. The chapters after that cover one part of the card each, in the order you are likely to meet them. The last two chapters are Troubleshooting and Specifications.
Keys you press are written as they appear on the keyboard: Return,
Esc, the arrow keys, and combinations such as Ctrl-OpenApple-Esc. Menu
items, buttons, and screen names are in bold. Text you
type, file names, and anything the screen shows verbatim are in
monospace.
Note
A note gives information that helps but is not required to complete the task.
Tip
A tip is a shortcut or an easier way to do something.
Warning
A warning tells you about something that can lose data, damage the card or the computer, or is hard to undo.
| Revision | Firmware | Change |
|---|---|---|
| 1 | 1.03 | First draft chapters. |
| 5 | 1.14 | Launch edition. Menu keys, boot menu, late CDA, one disk image per drive, recent disks on Browse R and Disk Drives R, Image Manager, update, and troubleshooting filled against the shipping screens. |
The CoGS card is a network card and a co-processor for the Apple II family. It plugs into any slot of an Apple ][+, Apple //e, or Apple IIGS, connects to your network over Wi-Fi or a wired Ethernet cable, and gives the computer three things it did not have before.
A disk library on the network. The card appears to the Apple II as an ordinary disk drive. The disk it serves is a disk image file fetched over the network, one block at a time, from the a2cogs.com catalog of over a thousand boot-tested disk images or from a folder you share from your own computer. Your Apple II boots from it the way it boots from a floppy or hard disk. Nothing is installed on the Apple II and no storage card is needed.
Modern internet access. The card carries the parts of the modern internet that an Apple II cannot run itself. It performs TLS encryption, fetches pages and API responses over HTTPS, resolves names, and keeps the clock set from network time. Programs on the Apple II talk to it through a few slot registers and receive plain text.
Audio and pictures on the IIGS. On an Apple IIGS the card also plays music and internet radio through the Ensoniq sound chip and shows box art and title screens in Super Hi-Res, HGR, and double hi-res, all served from the network. This part is IIGS only, and it runs from the CoGS Config desk accessory once GS/OS is at the Finder. The startup menu and the 8-bit machines have disks and networking, not audio or pictures.
The card’s own screens live in the card. You do not install a program on a boot disk before you can use disks, Wi-Fi, or the card menu. On a IIGS the card also puts a desk accessory named CoGS Config on the machine after GS/OS reaches the Finder. Chapter 8 covers the optional Control Panel files and Marinetti.
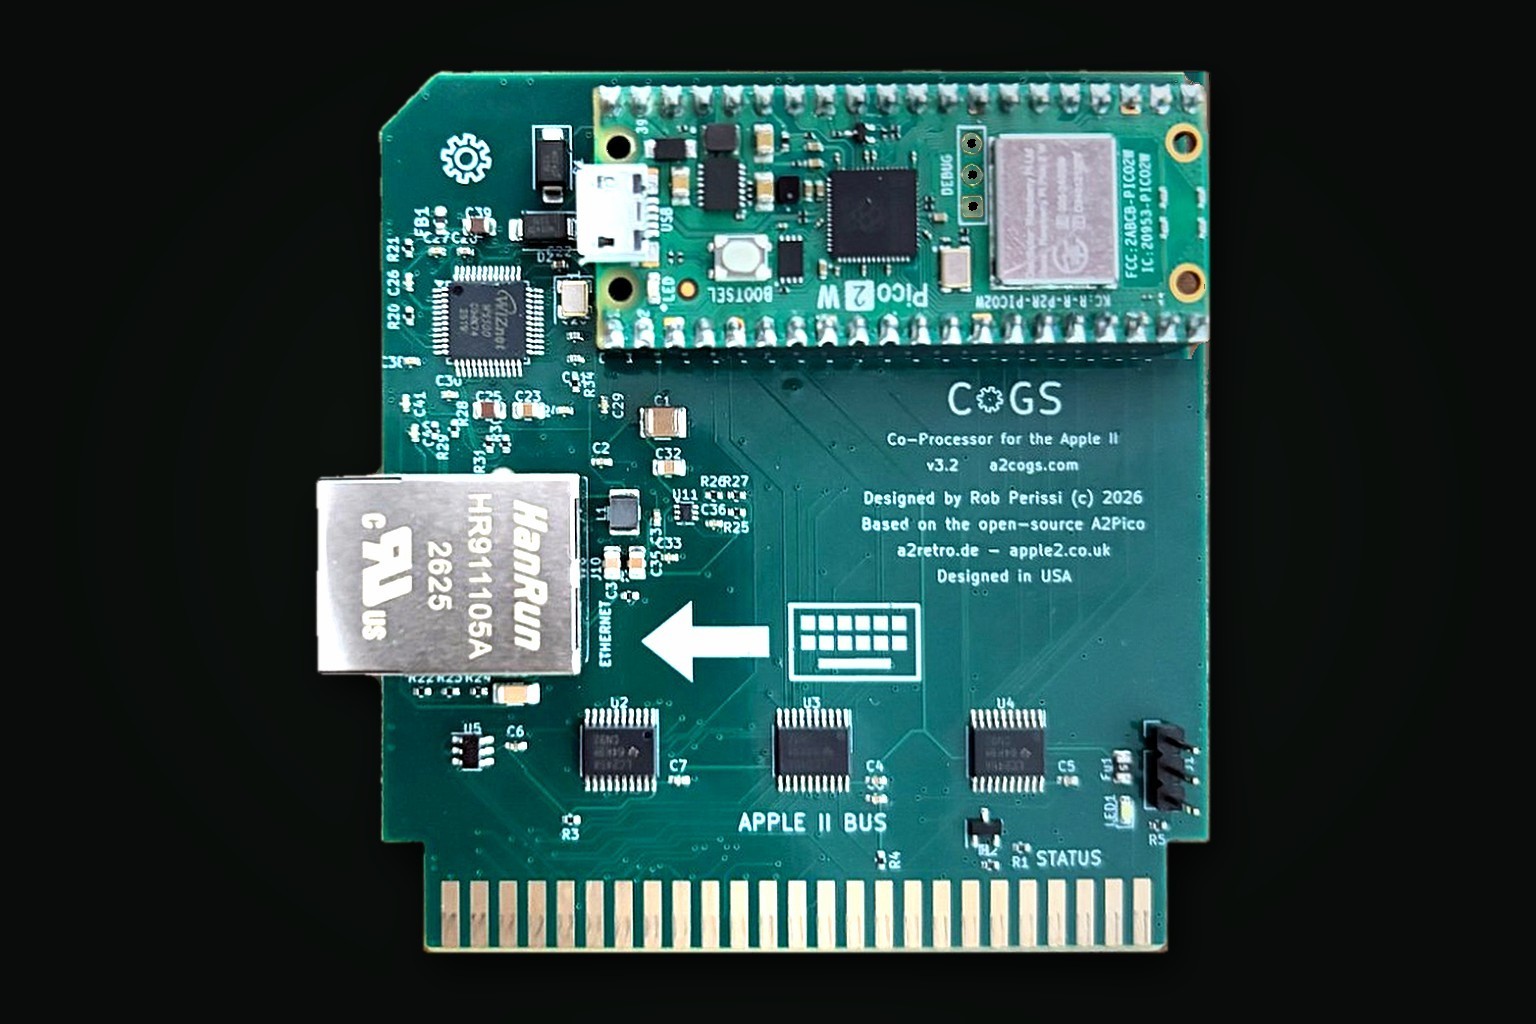
The board is a single slot card. The edge connector goes into the slot. The Raspberry Pi Pico 2 W sits on the card and is the processor and the Wi-Fi radio. The Ethernet jack is on the front edge, the end toward the keyboard. The Pico’s USB connector is used only when you update the firmware from a computer. Do not press on the Pico or on the small parts around it.
You do not need a boot disk, a storage card, an SD card, or a second computer.
A finished card ships with firmware on it. A kit that you assemble from an A2Pico carrier and a Pico 2 W needs the firmware file from a2cogs.com or the GitHub Releases page before it will talk to the Apple II. Chapter 10 covers flashing.
Warning
Turn the computer off and unplug it before you open the lid or touch a slot. Installing a card with the power on can damage the card and the computer.
Handle the card by its edges.
This chapter takes a new card from the box to a running disk image. It assumes an Apple IIGS. The differences on an Apple //e or ][+ are noted where they occur. Read Chapter 1 first if you have not.
On a IIGS the slot has to be set to Your Card in the Control Panel before the card is visible. Skip this step on a //e or ][+.
When the computer starts from the card for the first time, the card has no network to join and no disk to boot, so it shows its own menu (Chapter 4 has a picture of it and covers every page).
If you plugged in an Ethernet cable, the card uses it in preference to Wi-Fi and no Wi-Fi setup is needed. Card Status (press 8) shows which connection is active.
Tip
If you missed the menu because a disk was already configured, hold M while the computer starts from the card. The menu opens before anything boots. C does the same, and leaves M free if a CFFA3000 is still in the machine.
That is the whole procedure. The disk image streams over the network as the program runs.
The disk you booted stays set as the boot disk. The next time the computer starts from the card it boots that disk without stopping at the menu. To boot something else, hold M as the computer starts, press 3, and pick again. Or hold the drive number 1 through 8 (1 through 4 on an 8-bit machine) through power-on to boot that drive.
Disk Drives (press 6) shows what is mounted in each drive. From there you can point any drive at a disk image, clear it, pick one from the last twelve you used (R) and put it on the selected drive, or turn on a short boot menu that lists the drives at power-on. Browse Disks has the same twelve under Featured (R), as a list like Featured.
The card fits any slot of an Apple ][+, Apple //e, or Apple IIGS. This chapter covers the physical installation in each machine, the Ethernet connection, the IIGS slot settings, and how to check that the computer sees the card.
Any slot from 1 to 7 works.
On a IIGS, slot 7 is the usual choice. Nothing built into the machine uses it, and it is easy to reach. Slot 5 is also common. Slot 3 works, but the card then presents four drives instead of eight, because slot 3 is the slot ProDOS treats as a four-drive card.
On a //e or ][+, slot 7 is again the usual choice. The Autostart ROM
looks for a bootable disk from slot 7 down to slot 1. If you want the
machine to boot from CoGS without typing a command, put the card in the
highest-numbered slot that has a disk controller. If another disk card
sits in a higher slot, that card wins the boot scan. You can still start
CoGS with PR#n from BASIC, where n is the slot number.
Do not put two cards in the same slot. Do not force the card. If it does not seat, pull it, check the connector, and try again.
Then set the slot in the IIGS Control Panel.
Warning
If the slot is not Your Card, the IIGS will not talk to the card. The boot menu will not appear, Browse will not run, and GS/OS will not see the drives. This is the first thing to check when a new install looks dead.
There is no Your Card setting on these machines. If
the card is the highest disk controller, the machine boots from it.
Otherwise type PR#n from BASIC, where n is the slot, or
hold C or M as the machine starts from the card to open the menu.
Audio and pictures are IIGS only. An 8-bit machine still gets disks, Wi-Fi, Ethernet, Browse, the clock, and firmware update.
The Ethernet jack is on the card’s front edge, facing the keyboard, so the cable enters at the back of the case and loops forward to the card.
Tip
If you expect to connect and disconnect the cable often, a short panel-mount Ethernet extension (Adafruit product 909 is one) puts a jack in a back-panel opening so the lid stays closed. On its own the panel mount sits in front of a slot. A DB25 back plate with a small opening (JCM sells one) mounts the jack over the power supply without covering any slot.
When both Ethernet and Wi-Fi are available the card uses Ethernet.
Card Status shows
Path: Ethernet (Wi-Fi is fallback). Unplug the cable and
the card falls back to the saved Wi-Fi network.
On a IIGS with Startup Slot set to the CoGS slot and no boot disk saved, the card menu appears as the machine starts. On a later visit, hold M through power-on to force the menu. C does the same.
On a //e or ][+, PR#n from BASIC opens the same menu if
the card is answering.
Once you are in the menu, press 8 for Card Status. A live card shows the slot number, the firmware version on About / Update (press 0), and either a Wi-Fi or Ethernet address after you join a network.
If the menu never appears, work through Chapter 11, starting with the slot setting and the seating of the card.
Everything the card does is reached from its own menu, built into the card and shown on the Apple II’s text screen. This chapter covers every screen of the menu. The menu appears when the computer starts from the card’s slot and has nothing to boot, and at any time you hold M while it starts from the card. C opens the same menu. M is the CFFA3000 key, so it stays familiar if you move off that card. If you keep both, start from the CFFA and hold M for that menu. Start from CoGS and hold C, and M stays with the CFFA. On a IIGS the same pages are also in CoGS Config after the Finder is up (Chapter 8).
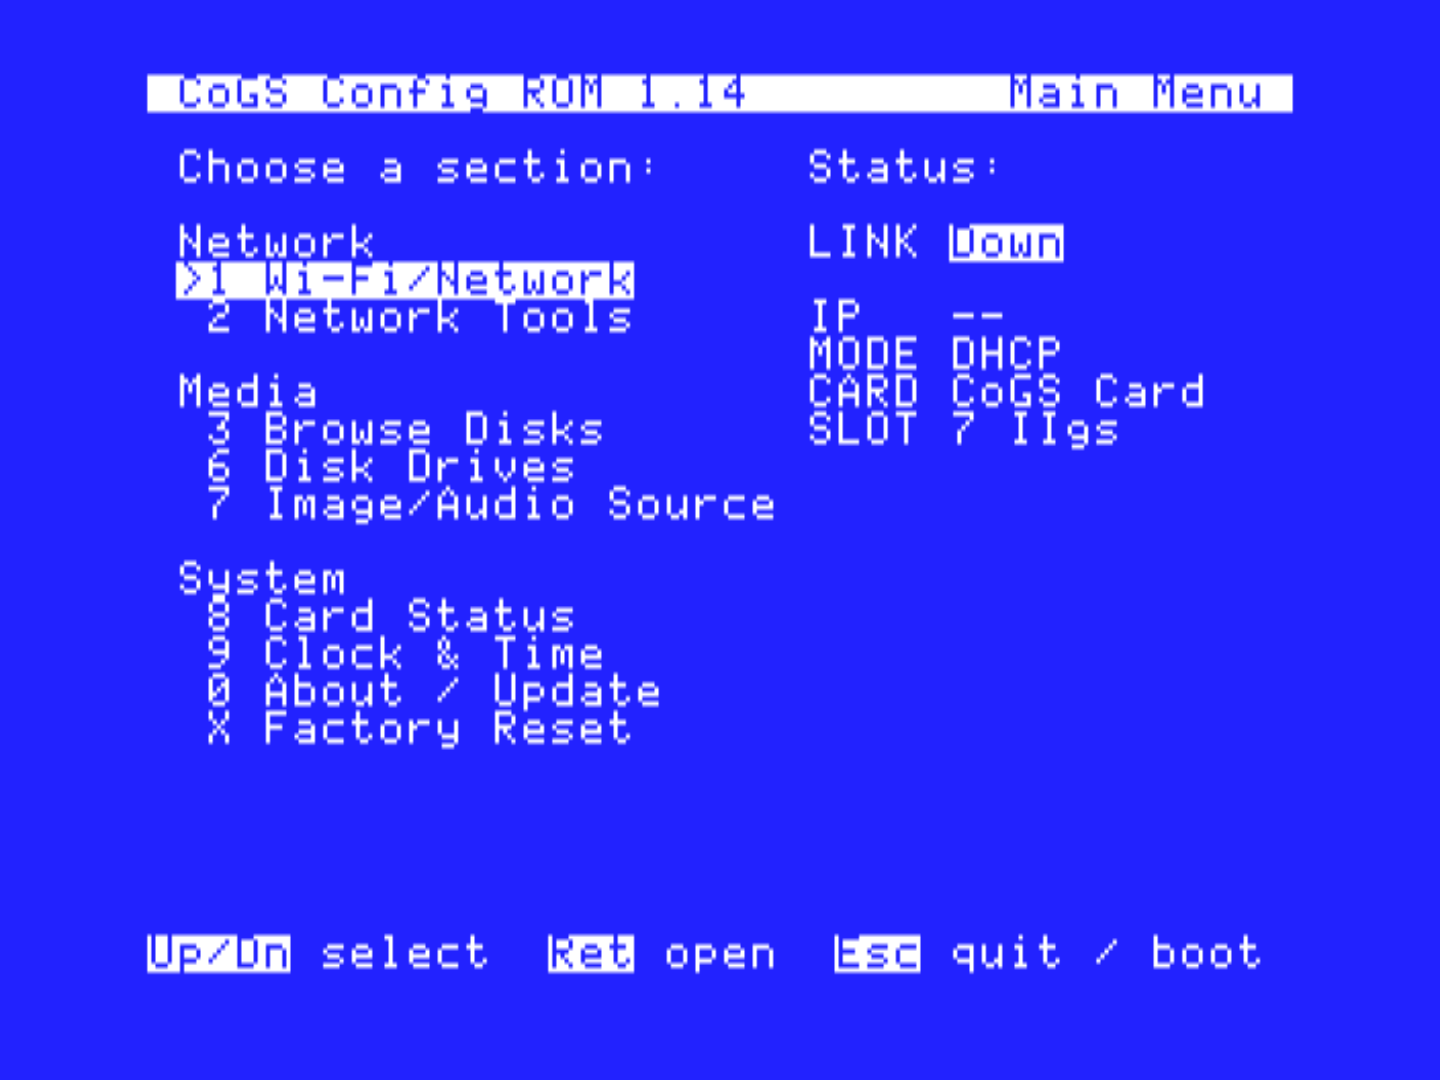
The menu is in three groups. Network holds Wi-Fi/Network and Network Tools. Media holds Browse Disks, Disk Drives, and Image/Audio Source, and on a IIGS under GS/OS also Browse Audio and Browse Pictures. System holds Card Status, Clock & Time, About / Update, and Factory Reset. The column on the right shows the link, the card’s address, and the slot.
The same menu comes up in two places, and they are not quite the same. The startup menu runs from the card’s ROM on any Apple II, before anything has booted. On a IIGS the menu is also the CoGS Config desk accessory, opened with Ctrl-OpenApple-Esc once GS/OS has reached the Finder. The desk accessory carries two rows the startup menu does not, 4 Browse Audio and 5 Browse Pictures. Audio and pictures run only there, and only on a IIGS. The startup menu cannot play or view, and an 8-bit machine has no sound chip or Super Hi-Res to use, so the rows do not appear in either case. The other items keep the same numbers everywhere.
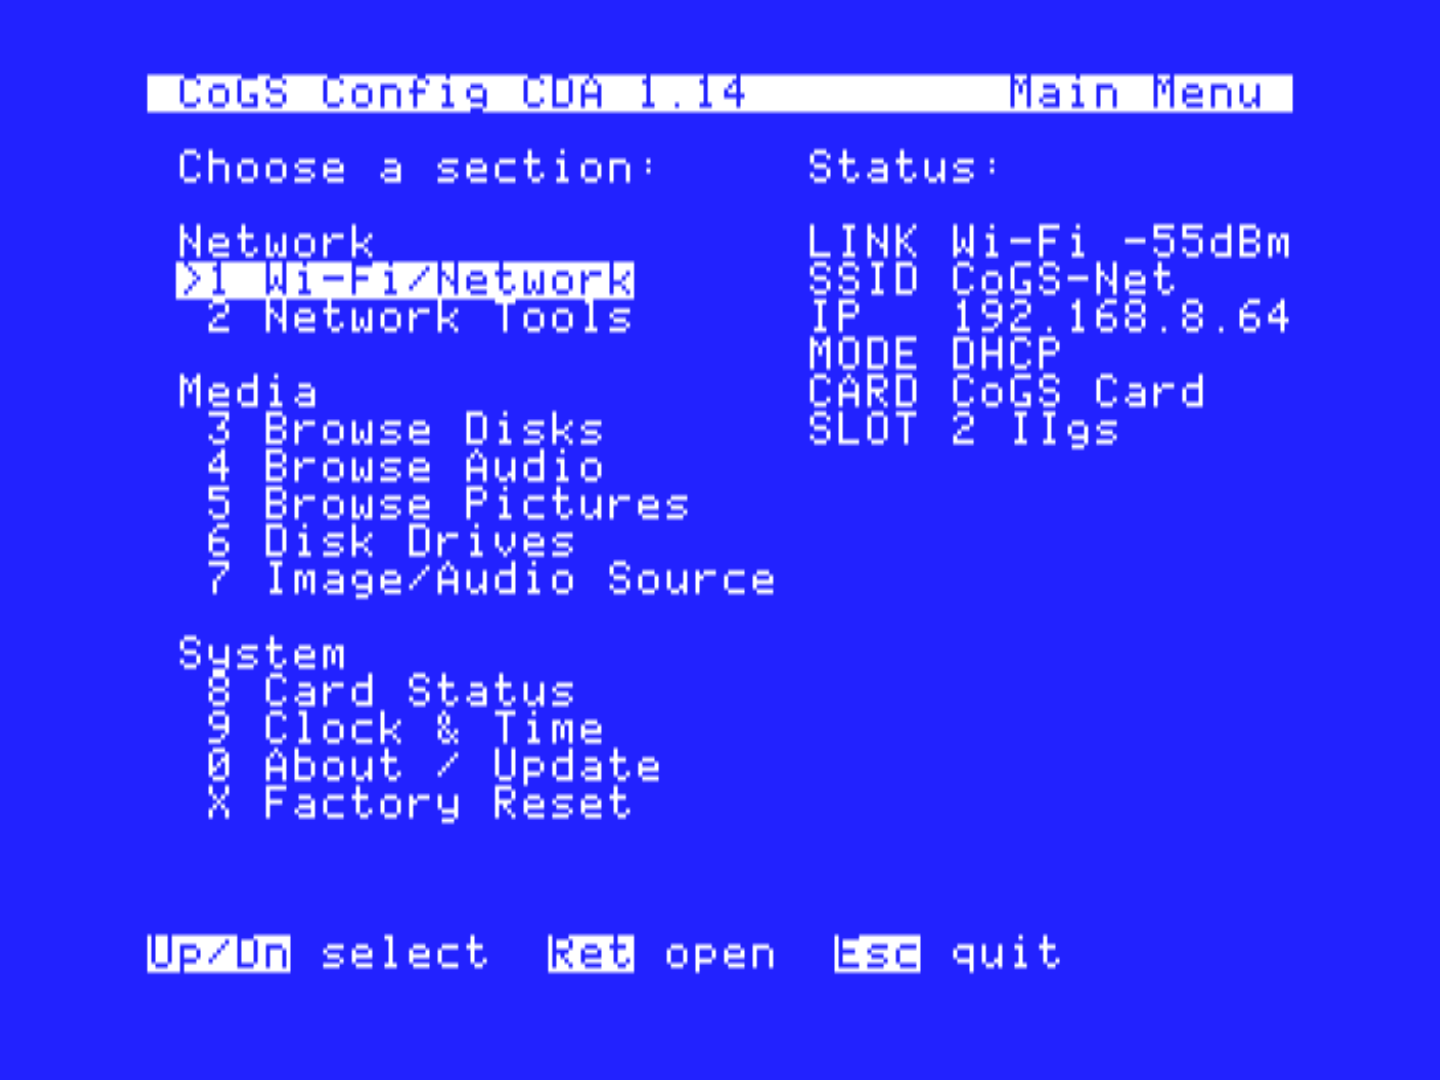
Press the item’s digit (or X for Factory Reset), or move with the Up and Down arrows and press Return. Esc leaves a page. From the main menu, Esc on a machine that was about to boot continues the boot.
| Key | Opens |
|---|---|
| 1 | Wi-Fi/Network |
| 2 | Network Tools |
| 3 | Browse Disks |
| 4 | Browse Audio (CoGS Config on a IIGS) |
| 5 | Browse Pictures (CoGS Config on a IIGS) |
| 6 | Disk Drives |
| 7 | Image/Audio Source |
| 8 | Card Status |
| 9 | Clock & Time |
| 0 | About / Update |
| X | Factory Reset |
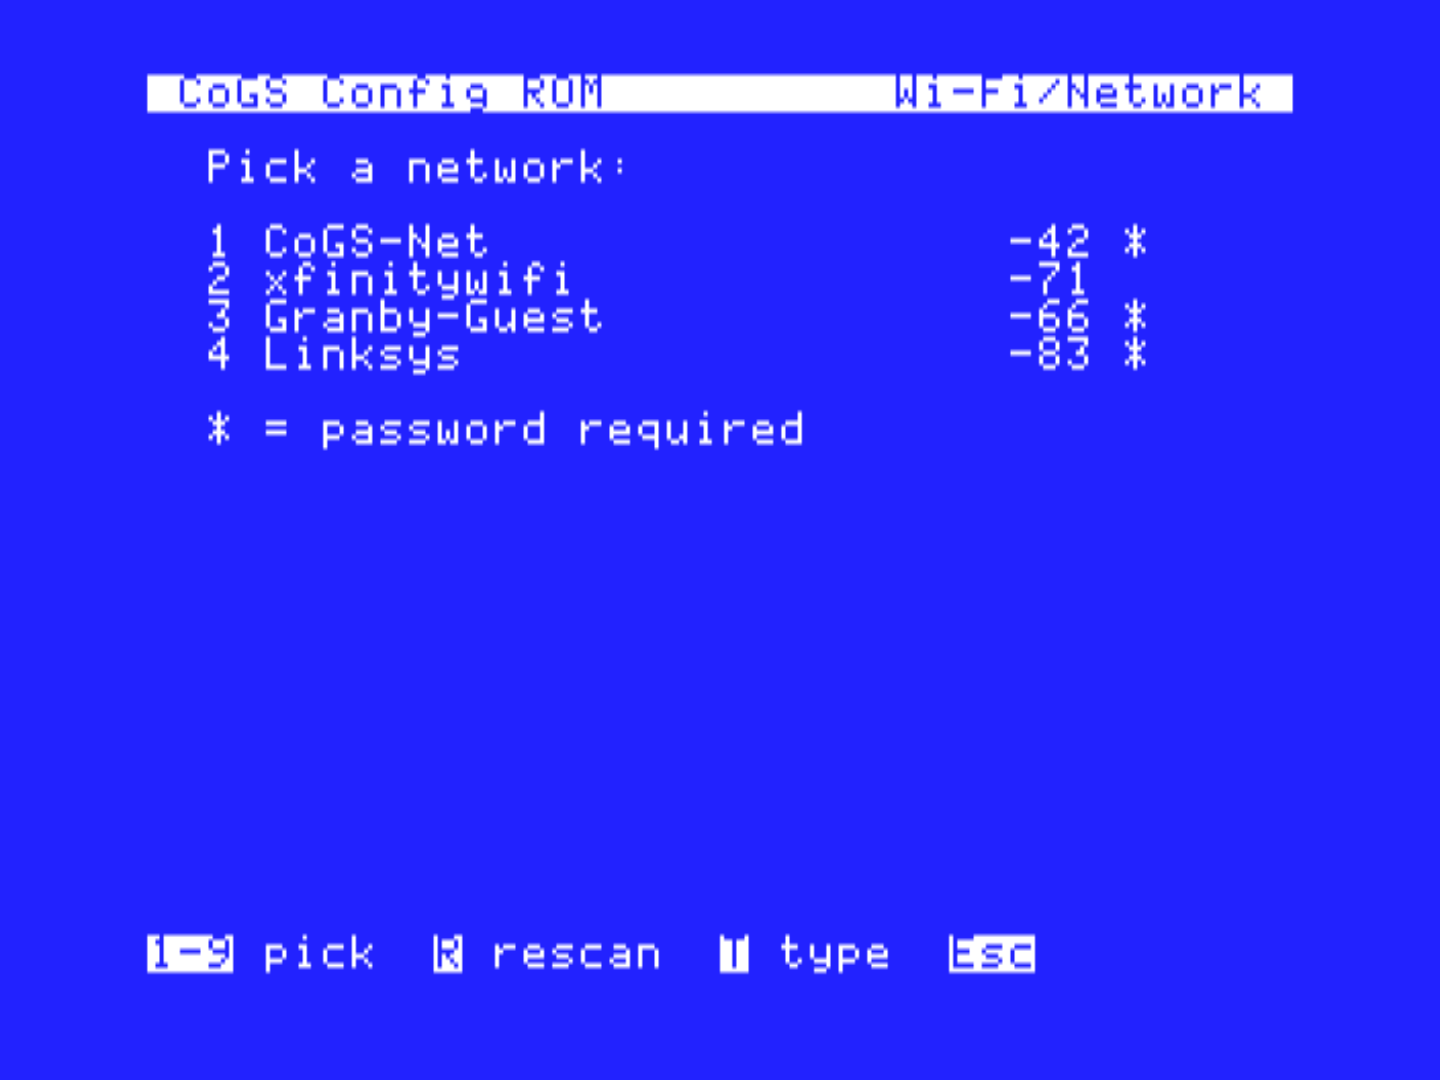
This page shows the network the card is on, or that it is not joined. Return starts a scan. The card lists the networks it hears, strongest first. Pick one, type the password (case sensitive), and Return. The card saves the network and rejoins it on every start.
F forgets the saved network. That does not erase mounts or the catalog source.
Press I for the Card IP page. That is the card’s own address, not the Apple’s. The top of the page shows the address, mask, gateway, and DNS the card holds right now and how it got them. The card takes an address from your router (DHCP) unless you set one here. M switches the mode between DHCP and Static. Rows 1 to 5 hold the IP, mask, gateway, and two DNS servers. Press the row number and type digits and dots. Return sets the row. Tab sets it and moves to the next row. DNS1 empty means the gateway answers DNS. DNS2 is an optional backup. S saves and applies. One static address covers both ways onto the network. Wi-Fi uses it, and if a cable is plugged into the wired port the wired port takes it over until the cable comes out.
Note
On a IIGS that also runs Marinetti, the GS has its own address (Chapter 8). Do not set that address to the same numbers as the card. Two stacks on one address break both.
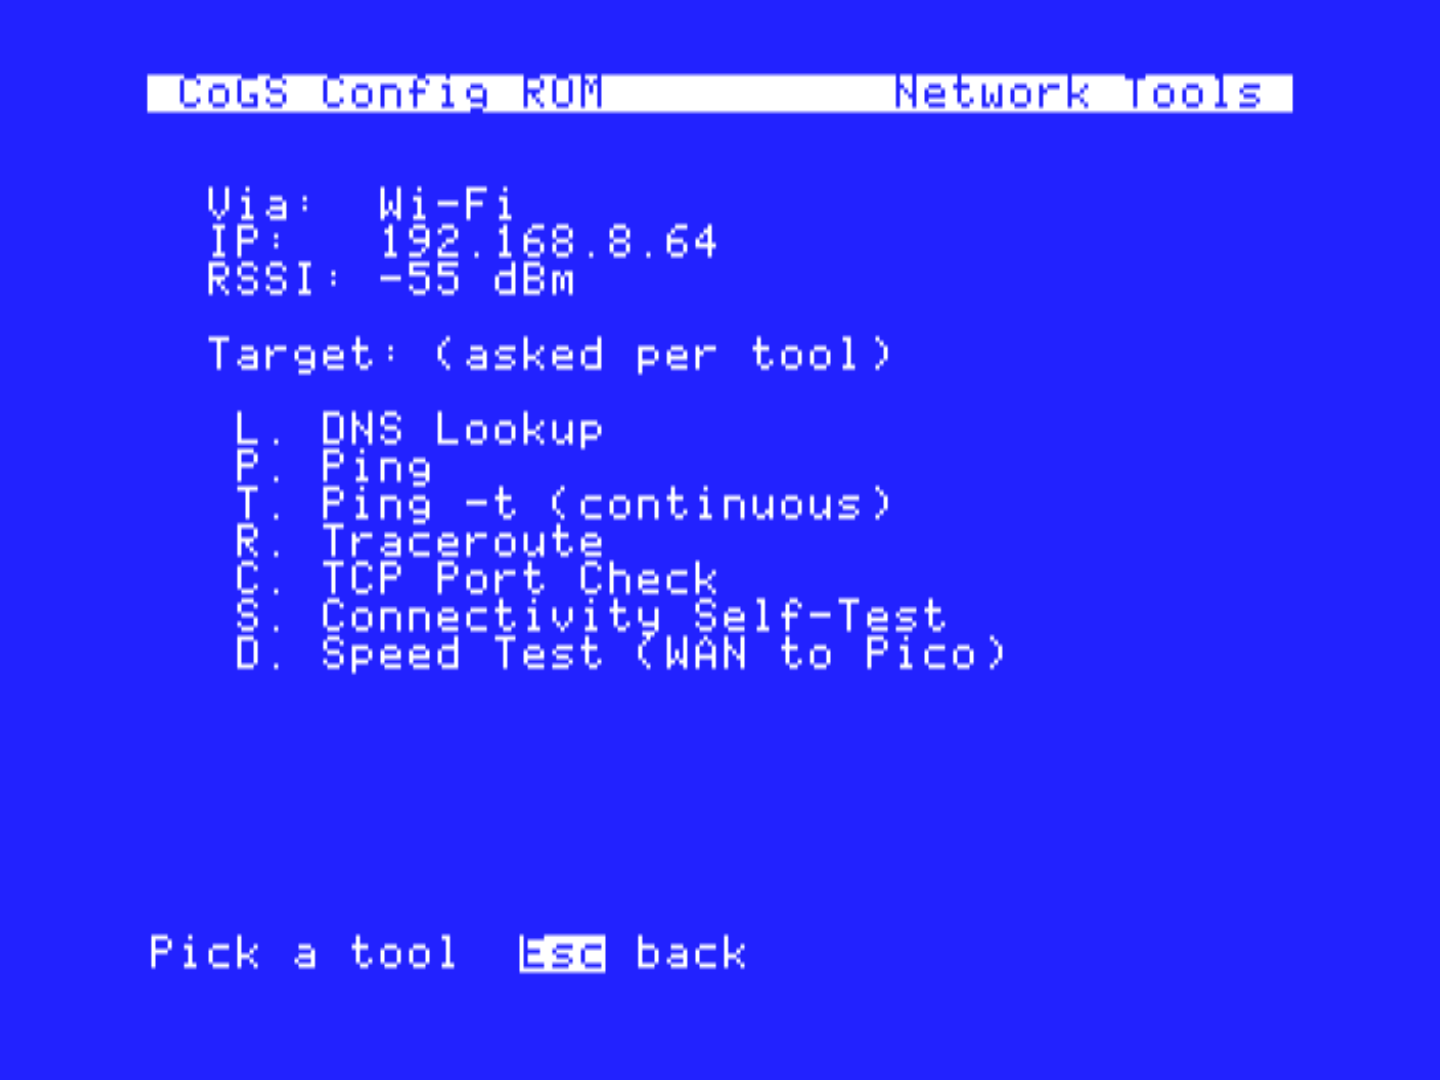
These tools run on the card. They need a live network (Wi-Fi joined or Ethernet with an address).
| Key | Tool |
|---|---|
| L | DNS Lookup |
| P | Ping (four echoes) |
| T | Ping, continuous, until Esc |
| R | Traceroute |
| C | TCP port check |
| S | Connectivity self-test (DNS, TCP, TLS) |
| D | Speed test, 256 KB HTTPS to the card. This is the card’s WAN path, not the Apple II bus. |
Each tool asks for a host name or address if it needs one. A good self-test ends with DNS, TCP, and TLS all working. Use these before you chase a Browse or boot failure that is really a network problem.
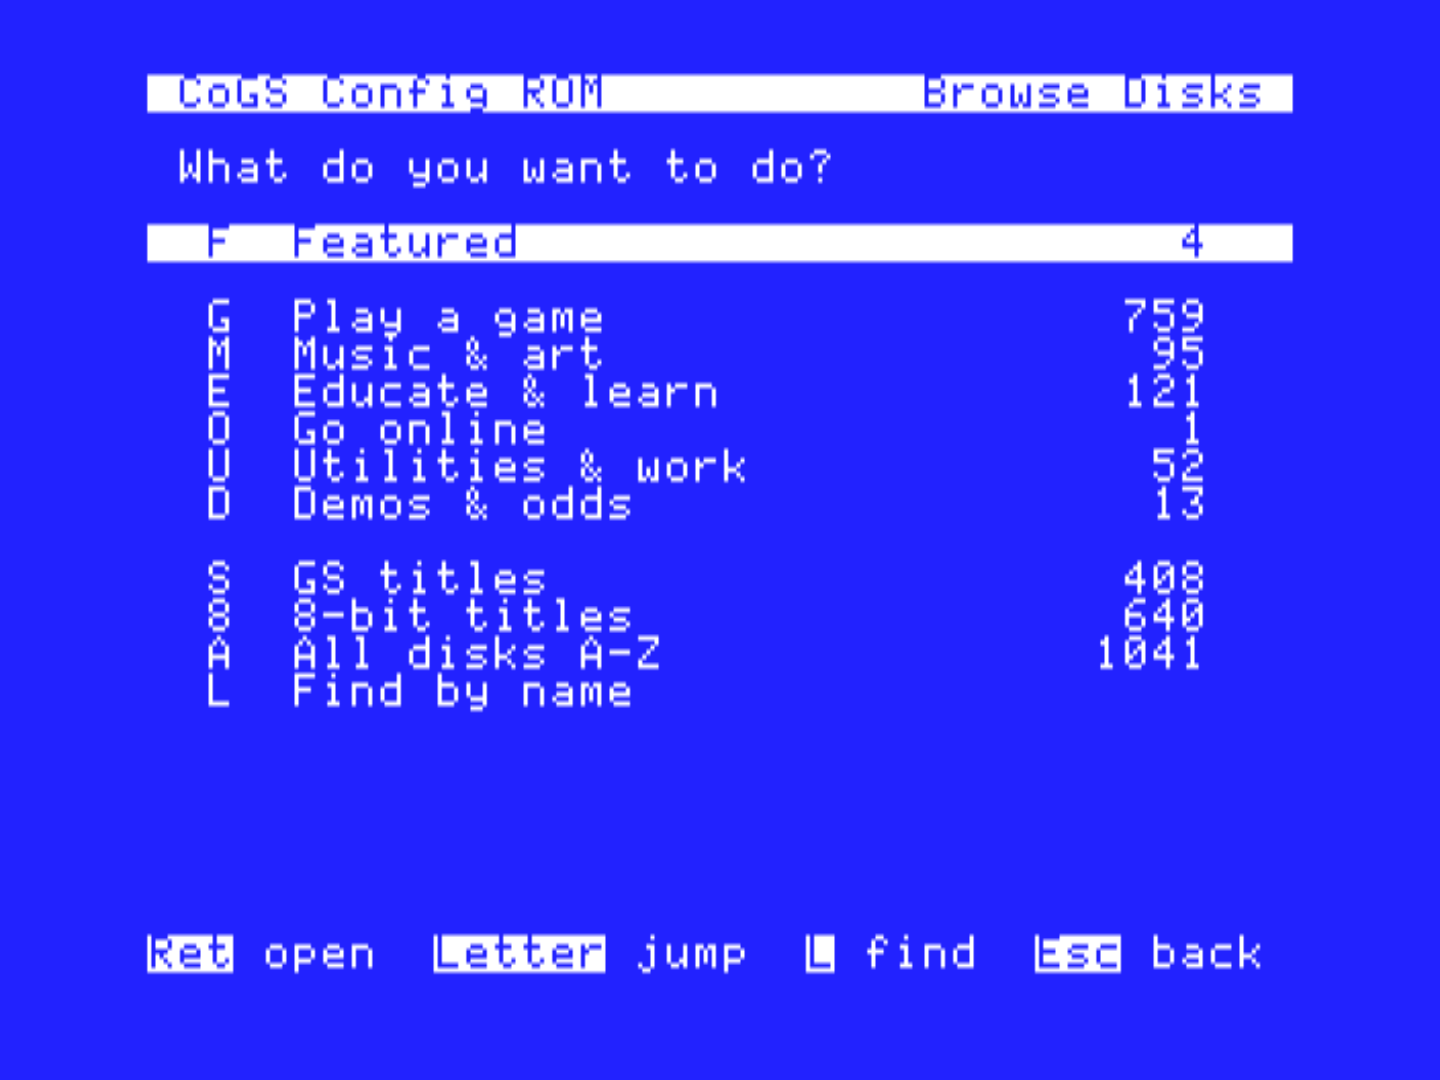
Browse Disks opens on What do you want to do? The first letters are the keys.
| Key | Shelf |
|---|---|
| F | Featured |
| R | Recent (the last twelve disks you mounted or booted). Return boots, 1-8 mounts. |
| G | Play a game |
| M | Music and art |
| E | Educate and learn |
| O | Go online |
| U | Utilities and work |
| D | Demos and odds |
| S | GS titles (IIGS only) |
| 8 | 8-bit titles (IIGS only) |
| A | All disks A to Z |
| L | Find by name (searches the a2cogs catalog) |
| Y | Your source, when you have saved one (Chapter 9) |
On an 8-bit machine the list is already limited to titles that machine can run, and the GS / 8-bit extra rows are omitted.
Y opens your share’s folders as categories when the share offers them (Image Manager does; Chapter 9), numbered 1 through 9, then 0, X, Z, with All A-Z and Find below. A share without folders opens as the plain A-Z list.
Inside a list, Up and Down move, N and P turn the page, G jumps to a page, L finds. Return on an entry makes it the boot disk and mounts it on drive 1. A digit 1 through 8 (1 through 4 on an 8-bit host, or in slot 3) mounts that disk image on that drive without changing the boot disk. V shows box art when the row has a V (IIGS). A B on the row means the disk image boots. An 8b mark is 8-bit software. A Dn mark means that disk image is already on drive n.
Note
The card will not put the same disk image on two drives. GS/OS cannot hold one volume twice. If you try, the card leaves the first mount alone and tells you which drive already has it.
Chapter 5 covers sources, several drives, and writing.
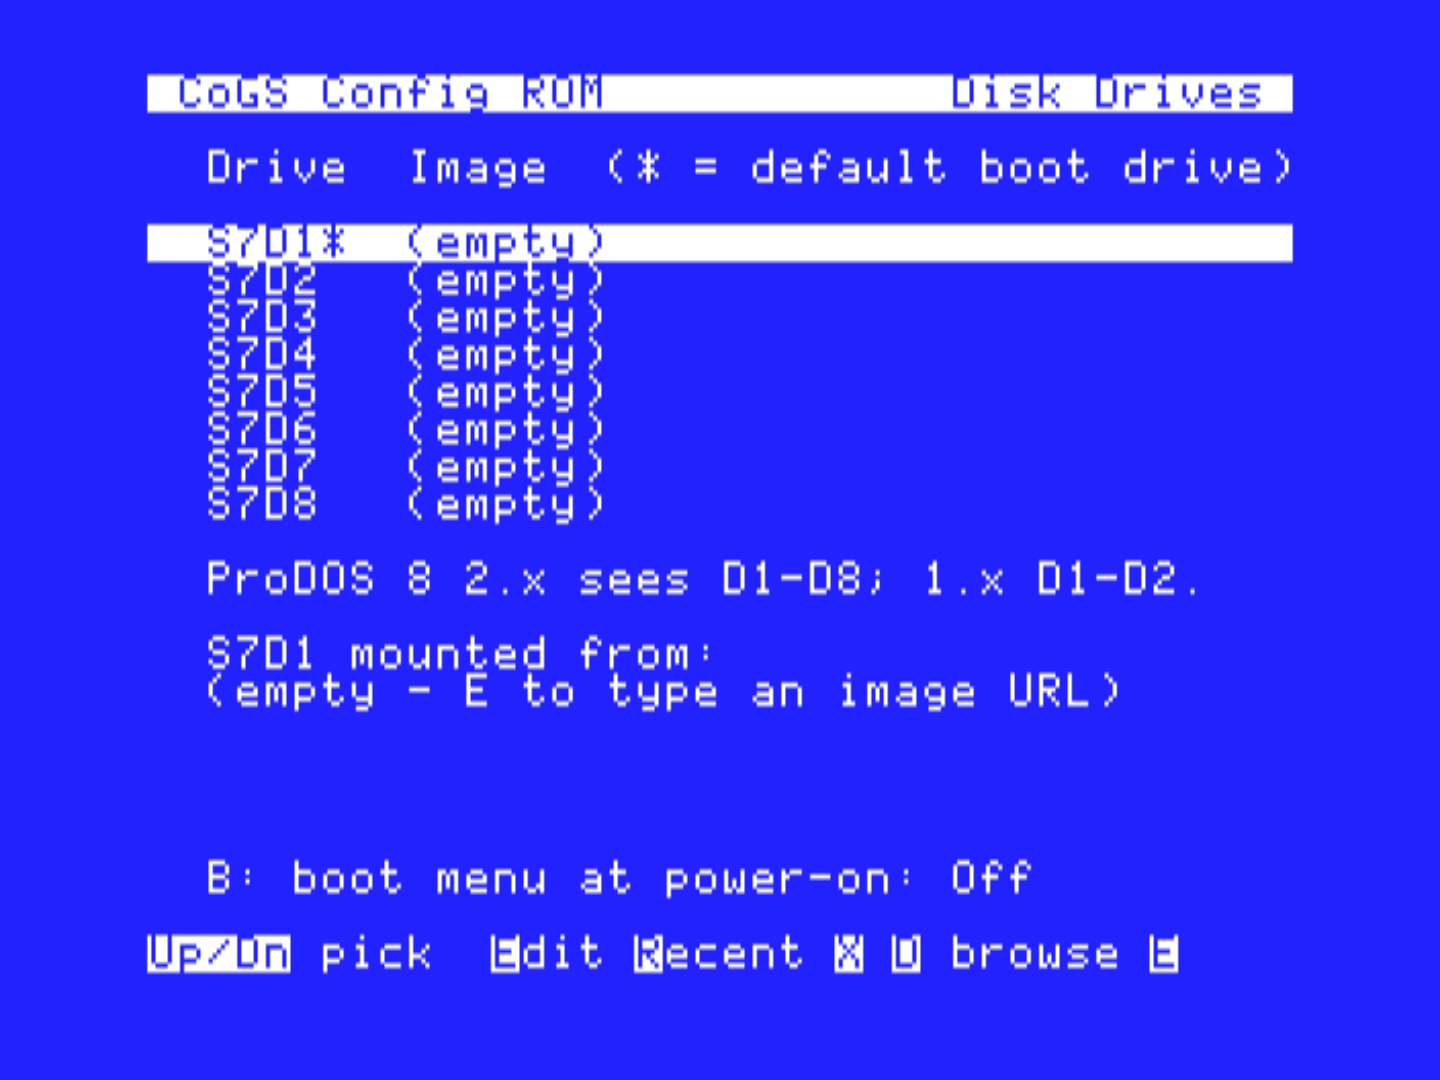
This page is the table of drives the card is presenting. Eight drives in most slots, four in slot 3 or on an 8-bit host that the card has capped.
The boot drive is drive 1. Return on a later drive that has a disk image swaps it with drive 1 so that disk image becomes the boot disk. E edits the URL on the selected drive. R opens the last twelve disks you mounted or booted and puts the one you pick on the selected drive. X clears the drive. D jumps to Browse Disks.
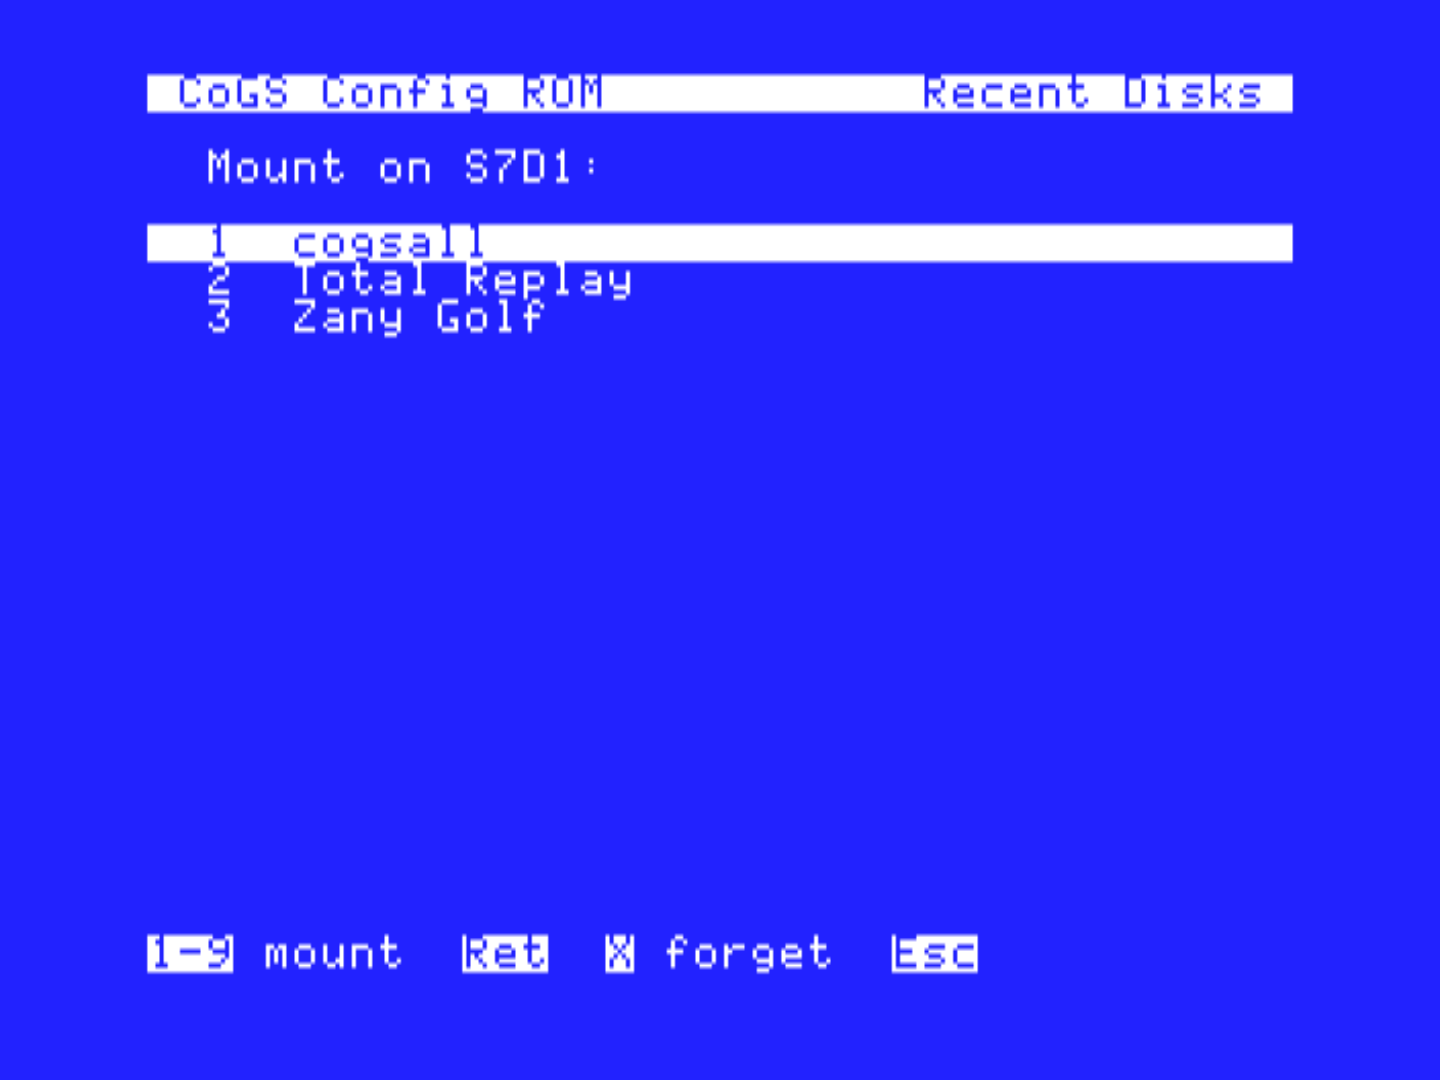
The recent list is newest first. A name comes from Browse when the card had one, otherwise from the filename in the URL. Press 1 through 9 (0, A, B if there are more) or Return to mount. X forgets that row. Esc goes back. Factory Reset clears the list.
B turns the power-on Boot Menu on or off. Off (the default) boots drive 1 at once. On, the card shows CoGS Boot Menu for 5, 10, or 15 seconds (B cycles those times). Press 1 through 8, or move and press Return, to boot that drive. M opens the full CoGS menu. Up and Down pause the countdown so a cursor move cannot boot drive 1 under you. Holding a drive number through power-on still works when the countdown is off.
A change to a mount is live for GS/OS. ProDOS 8 needs a restart from the CoGS slot before it sees a new drive.
The catalog you see in Browse comes from a2cogs.com unless you point a source at your own share. This page has three slots: disks, audio, and pictures. Each is a base URL. One Image Manager folder can fill all three. S scans the LAN for Image Manager shares and fills the slots from the one you pick. D, A, and P edit a slot by hand; C clears all three. Save a slot empty to remove Your source for it. When a share is saved, Browse grows a Y row for it, and Y opens on the share’s folders when it has them.
Chapter 9 lists the file types Image Manager accepts and what it converts (MP3 to PCM, JPEG to SHR, disks as-is).
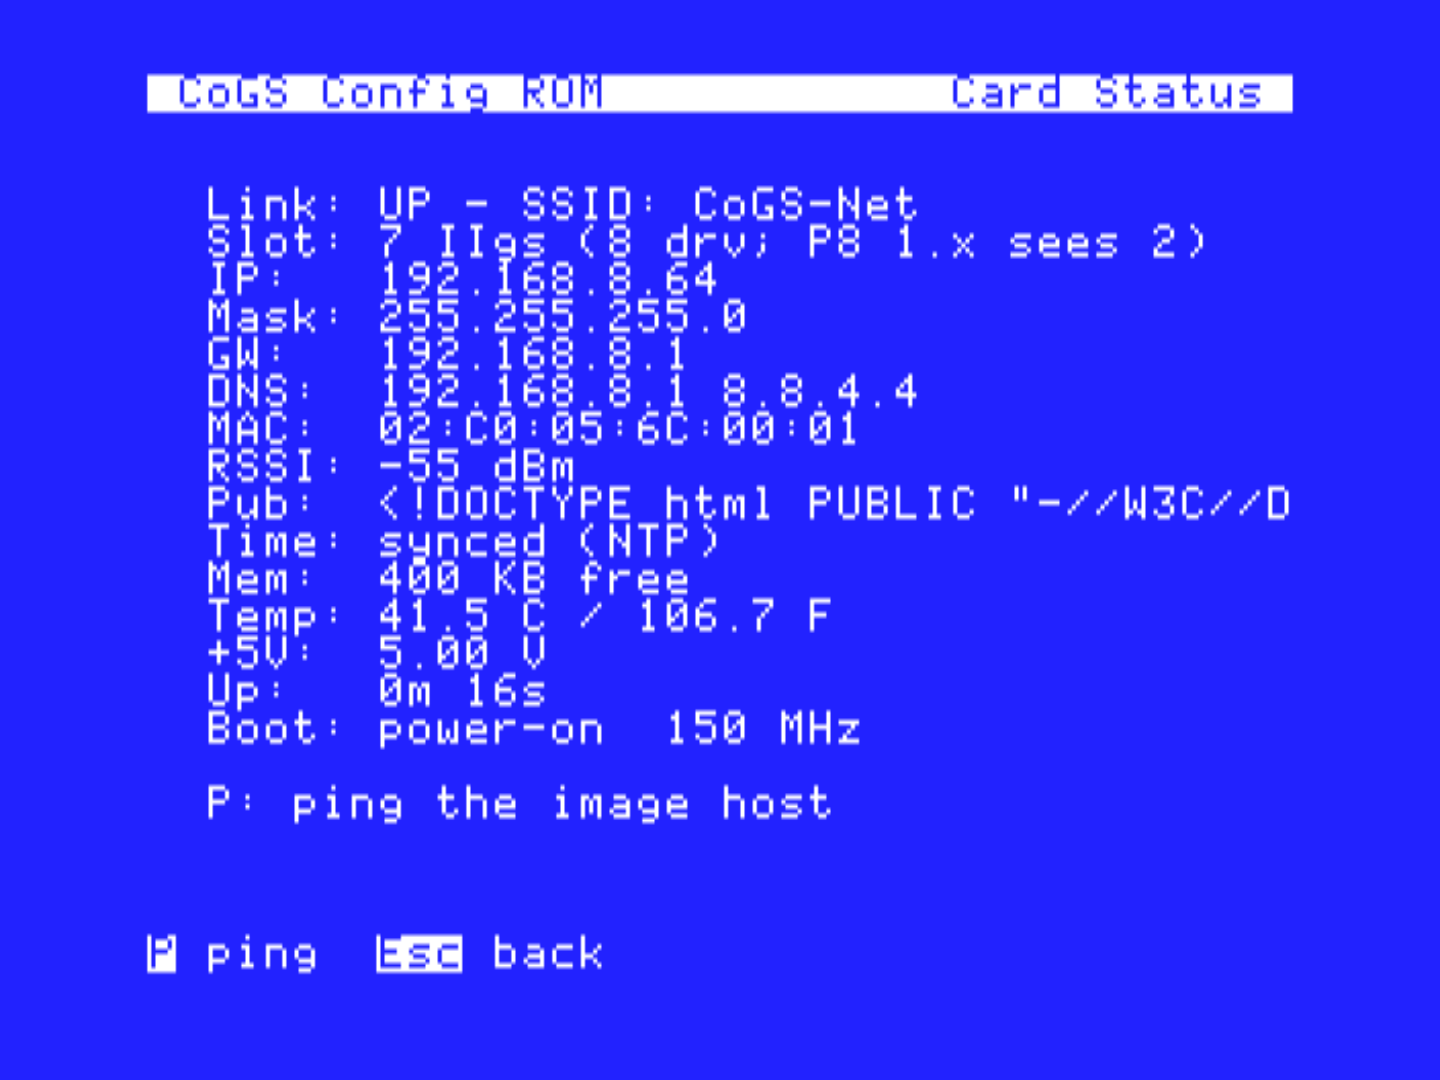
Read-only. Link, address, mask, gateway, DNS, MAC, and whether the path is Ethernet or Wi-Fi. Public address if the lookup works. Clock sync (HTTPS waits on it). If Marinetti is up, a line for the GS address. Come here first when something looks offline.
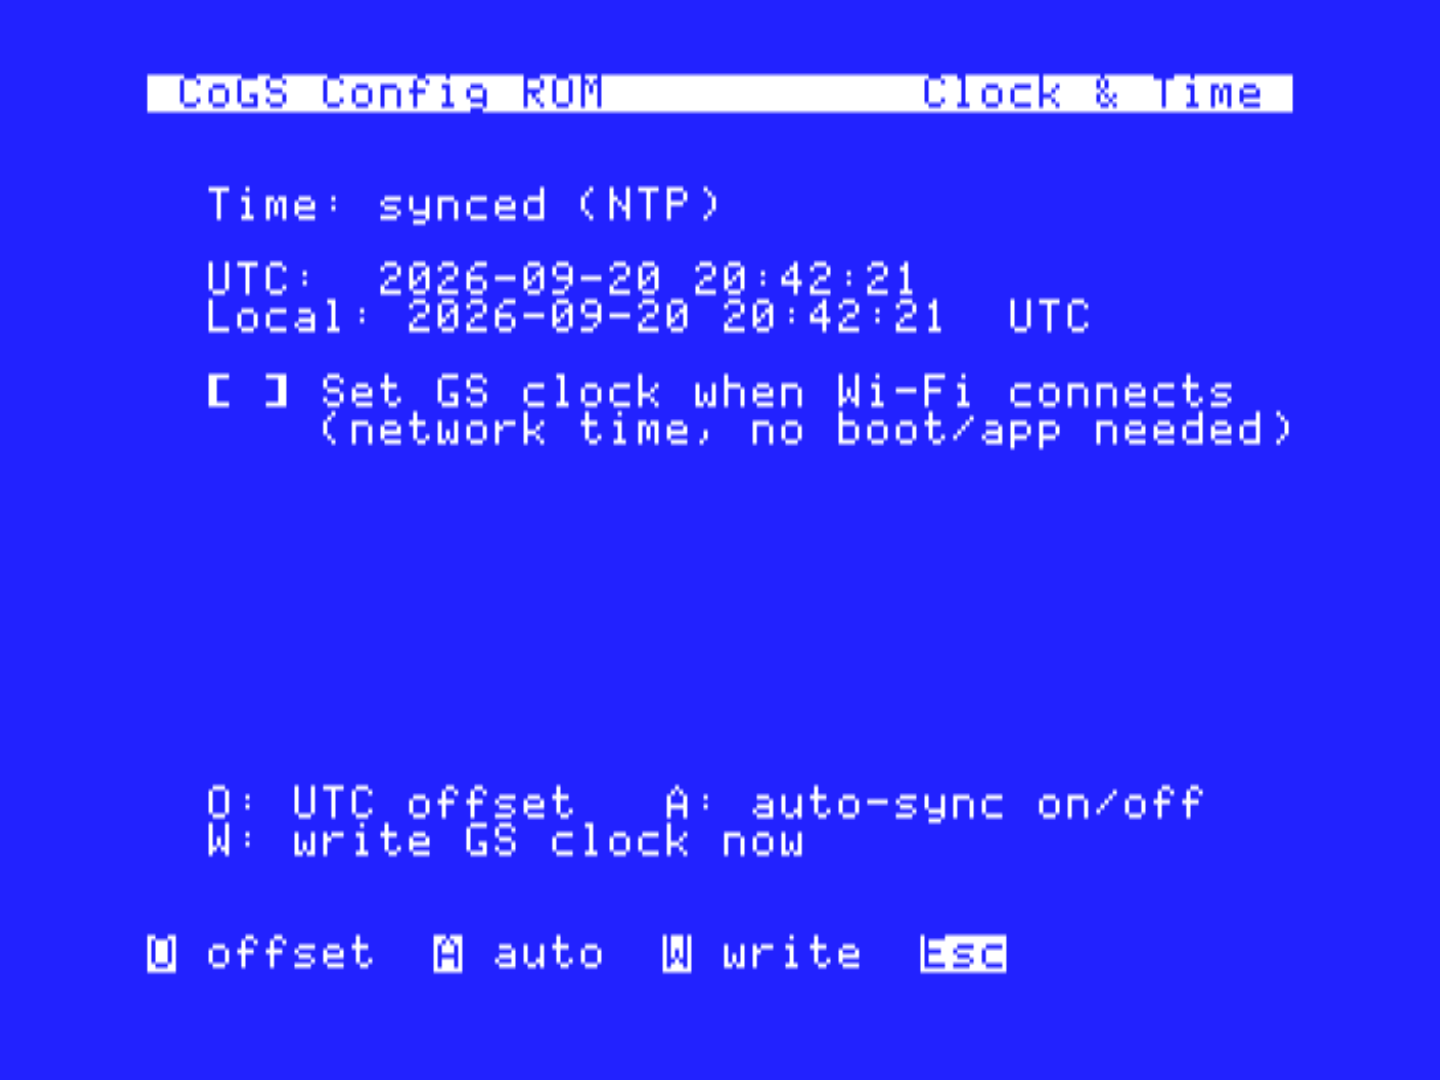
The card gets time from the network (NTP, or HTTP if NTP is blocked). TLS and HTTPS wait until that clock is set, so a Browse failure right after join can be “time not synced yet” rather than a bad catalog.
O sets the offset from UTC (-5, +1,
+9:30). A turns auto-write of the Apple clock on or off
when Wi-Fi connects. W writes the network time to the IIGS clock now (Y
to confirm). On a machine with no clock the page still keeps the offset
for the Local line.
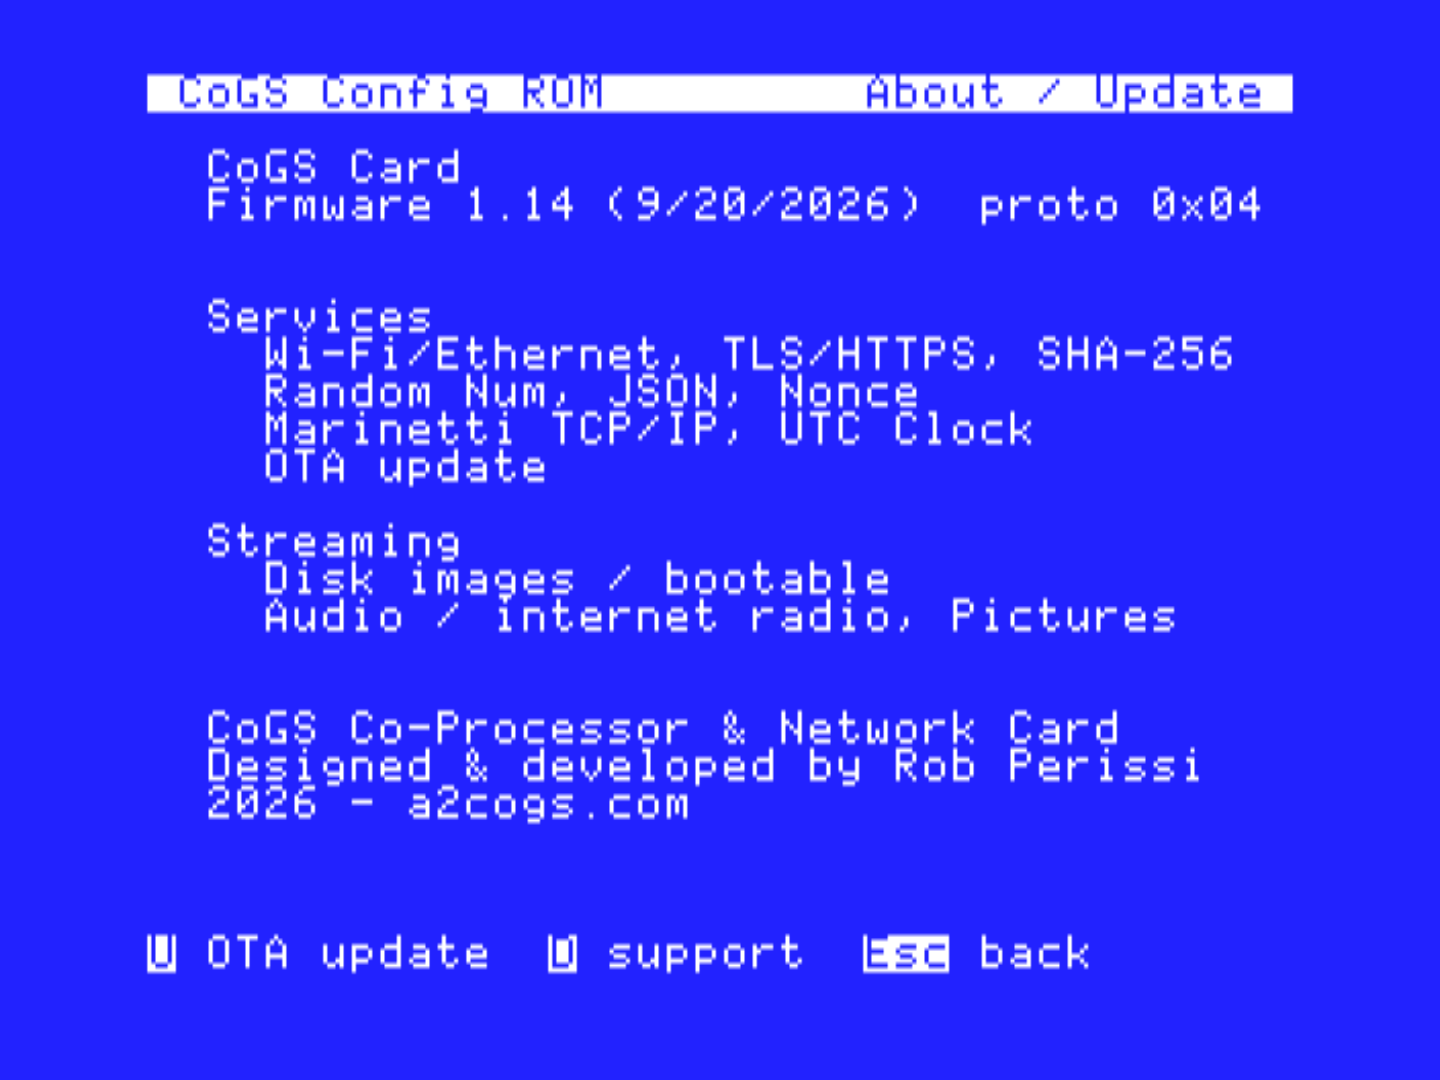
Firmware version and date, the services this card has, and the streaming faces. U opens the updater (Chapter 10). D shows support text.
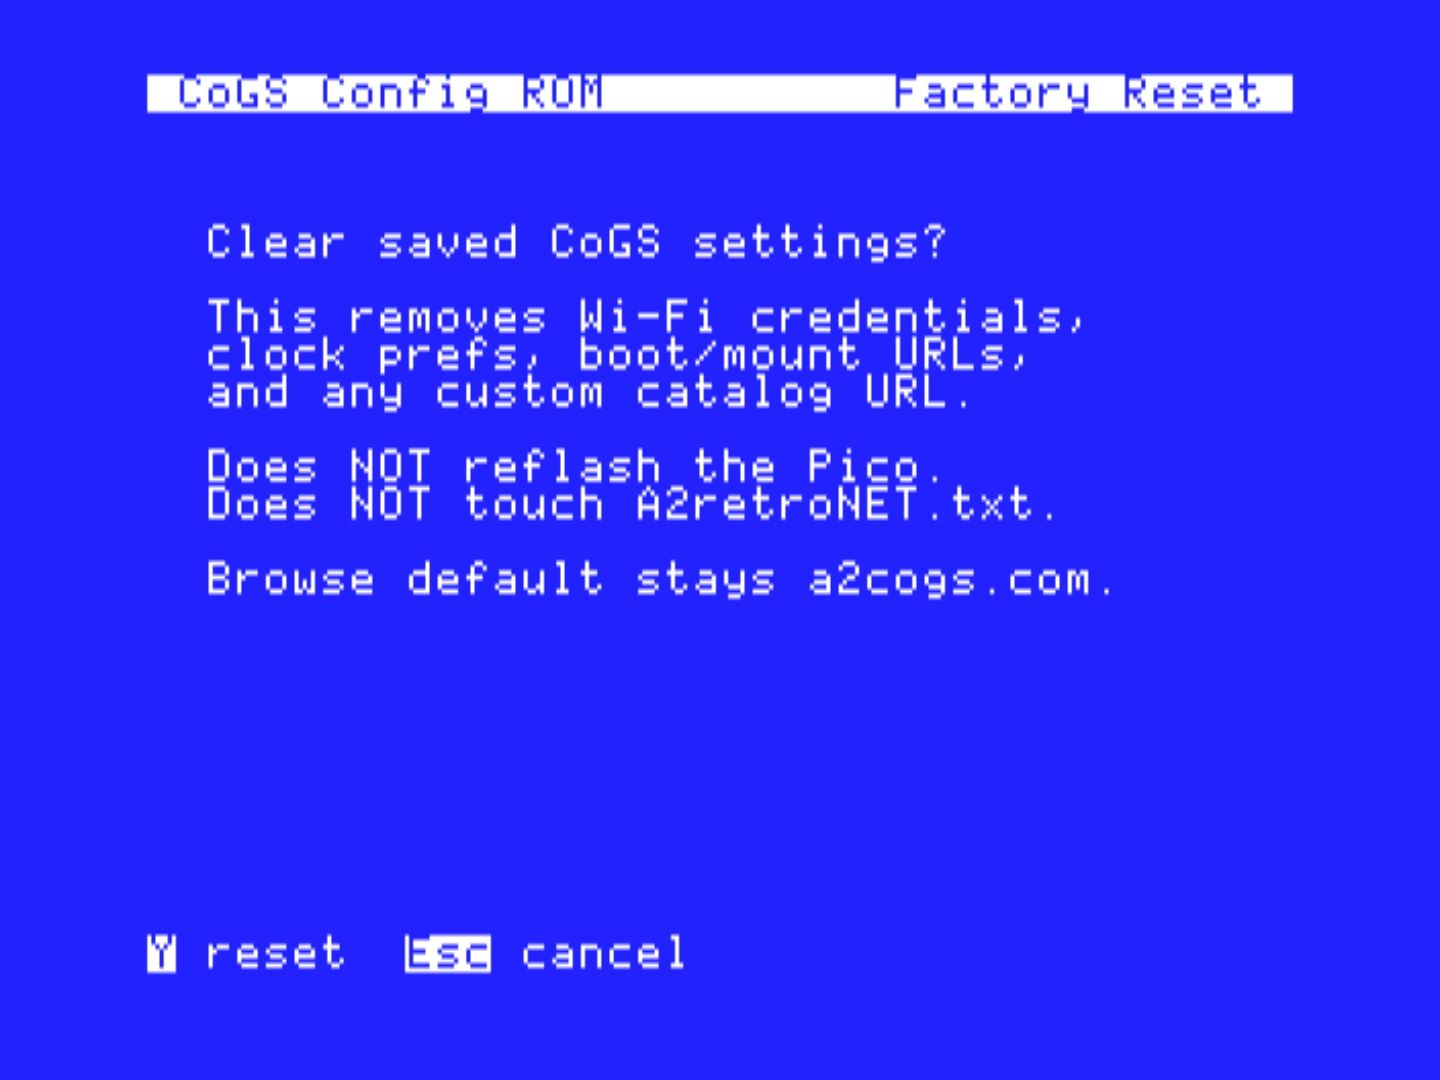
X from the main menu, then Y to confirm. This clears saved Wi-Fi, clock prefs, boot and mount URLs, the recent-disk list, and any custom catalog URL. Browse goes back to a2cogs.com. It does not reflash the Pico and it does not change the firmware. There is no undo other than joining the network and mounting disks again.
The card presents itself to the Apple II as a disk controller with several drives. Each drive holds a disk image that the card fetches over the network, block by block, as the computer reads it. This chapter covers where disk images come from, how to mount and boot them, how several drives work at once, and how writing to a disk works.
Two places, both HTTP or HTTPS with range requests.
The a2cogs.com catalog. Read-only, boot-tested, more than a thousand titles. Browse Disks opens on it unless you have replaced the disk source. Rows that can boot show a B. Games inside Total Replay are listed by name.
Your own share. A folder on a Mac running CoGS Image Manager (Chapter 9), or any web server that can serve the disk image files and a small catalog. Those disk images appear under Your source (Y), sorted into your own folders when the share offers them. They can be writable.
The card does not keep a copy of the whole disk image. It fetches the blocks the Apple II asks for and remembers recent ones so a warm boot of the same disk image is fast.
From the card menu press 3, or open CoGS Config and choose Browse Disks. The hub and list keys are in Chapter 4.
L finds by name. Type part of a title. The list is the matches, same Return and digit keys as the A to Z list.
If the hub cannot be fetched (no path to a2cogs.com), Browse falls back for that session. With Your source saved it opens on your folders, or on the plain A to Z list of the share when the share has no folders to offer.
Return on a Browse row does three things. It mounts the disk image on drive 1, it marks that mount as the boot disk, and it starts the computer from it.
The first time after you pick a new boot disk, the card may spend a few seconds opening the disk image while Wi-Fi finishes joining. If you just powered on, wait for Card Status to show an address before you decide the catalog is empty.
Holding a drive number through power-on boots that drive. Holding M opens the menu. The optional Boot Menu on Disk Drives (Chapter 4) lists the drives for a few seconds so you can pick without holding a key.
Most slots present eight drives, D1 through D8. Slot 3 presents four. An 8-bit host sees four.
D1 is the boot disk when the computer starts from the card. D2 through D8 are extra volumes. On a IIGS they show up on the Finder desktop once GS/OS has seen them. Mount a data disk from Browse with a digit, type a URL on Disk Drives with E, or press R on Browse (under Featured) or on Disk Drives for the last twelve disks you used.
One disk image, one drive. The card refuses a second mount of the same URL. Eject or clear the first drive if you meant to move it.
Tip
A title that wants a data disk in drive 2 is a Browse pick on the program, Return, then Browse again and press 2 on the data disk image.
Share a folder with CoGS Image Manager and save that URL as the disk
source (Chapter 9). Browse then has a Y row. Those disk images boot the
same way catalog disk images do. Image Manager does not convert disk
files. Drop .2mg, .po, or
.hdv.
Saves, high scores, and GS/OS desktop files land in the disk image file on your computer when the share is writable. Keep a copy of anything you care about. The card does not grow a disk image and does not create a new file. It only writes blocks inside a disk image that already exists.
Catalog disk images from a2cogs.com are read-only. The Finder may try to write a desktop database. That write does not stick, and it is harmless.
A writable share accepts those writes. If you replace a disk image
file on the share with another file of the same size and the same name,
the card may keep serving the old blocks until you wipe its cache from
the USB console (the w key) or power the card off long
enough to lose that cache. Prefer a new name, or a new size, when you
replace a file.
The card serves ProDOS-order disk images.
| Kind | Typical name | Notes |
|---|---|---|
| 2MG | .2mg |
Header plus ProDOS blocks. Usual GS/OS size. |
| PO | .po |
Raw ProDOS order. |
| HDV | .hdv |
Same as PO under another name. |
Volume size is up to 32 MB per disk image. DOS 3.3 and nibble disk images are not supported. A file that is not a ProDOS volume will not show a B and will not boot.
On an Apple IIGS the card plays music and internet radio through the computer’s Ensoniq sound chip. The player is part of CoGS Config and works from the GS/OS desktop or from any program that allows the Desk Accessories menu. This chapter covers the audio catalog, the player controls, internet radio, and background play.
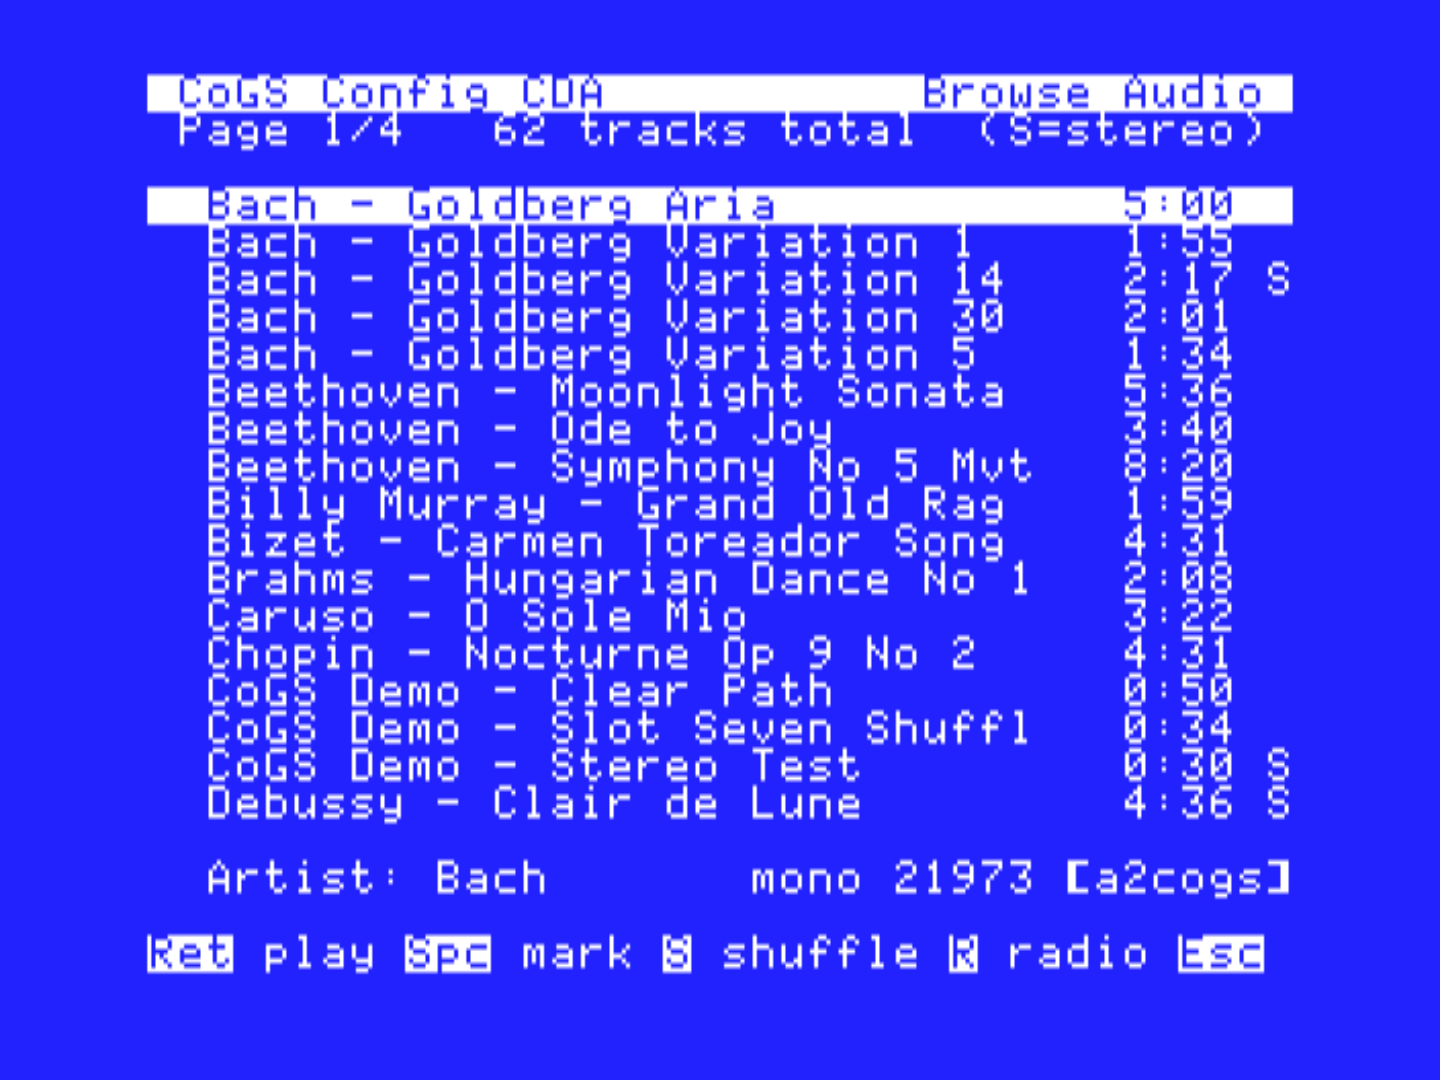
Audio is IIGS only and needs GS/OS and the desk accessory. The Browse Audio row is not on the card’s startup menu, and an 8-bit machine never shows it; it appears in CoGS Config after the Finder is up. Wait about ten seconds after the desktop appears, then open the Desk Accessories menu.
You do not put Tool 226 or Tool 219 in System:Tools. The
card supplies them when play needs them. They stay loaded until you
restart.
Browse Audio opens on What do you want to hear?
| Key | Shelf |
|---|---|
| S | SoundSmith misc |
| D | Demos and scene |
| P | Pop covers |
| H | Holiday |
| M | PCM songs |
| A | All tracks A to Z |
| L | Find by name (searches the a2cogs catalog) |
| Y | Your source, when you have saved an audio URL |
| R | Internet radio |
Y opens on the share’s folders that hold audio, then All tracks A-Z and Find (Chapter 9).
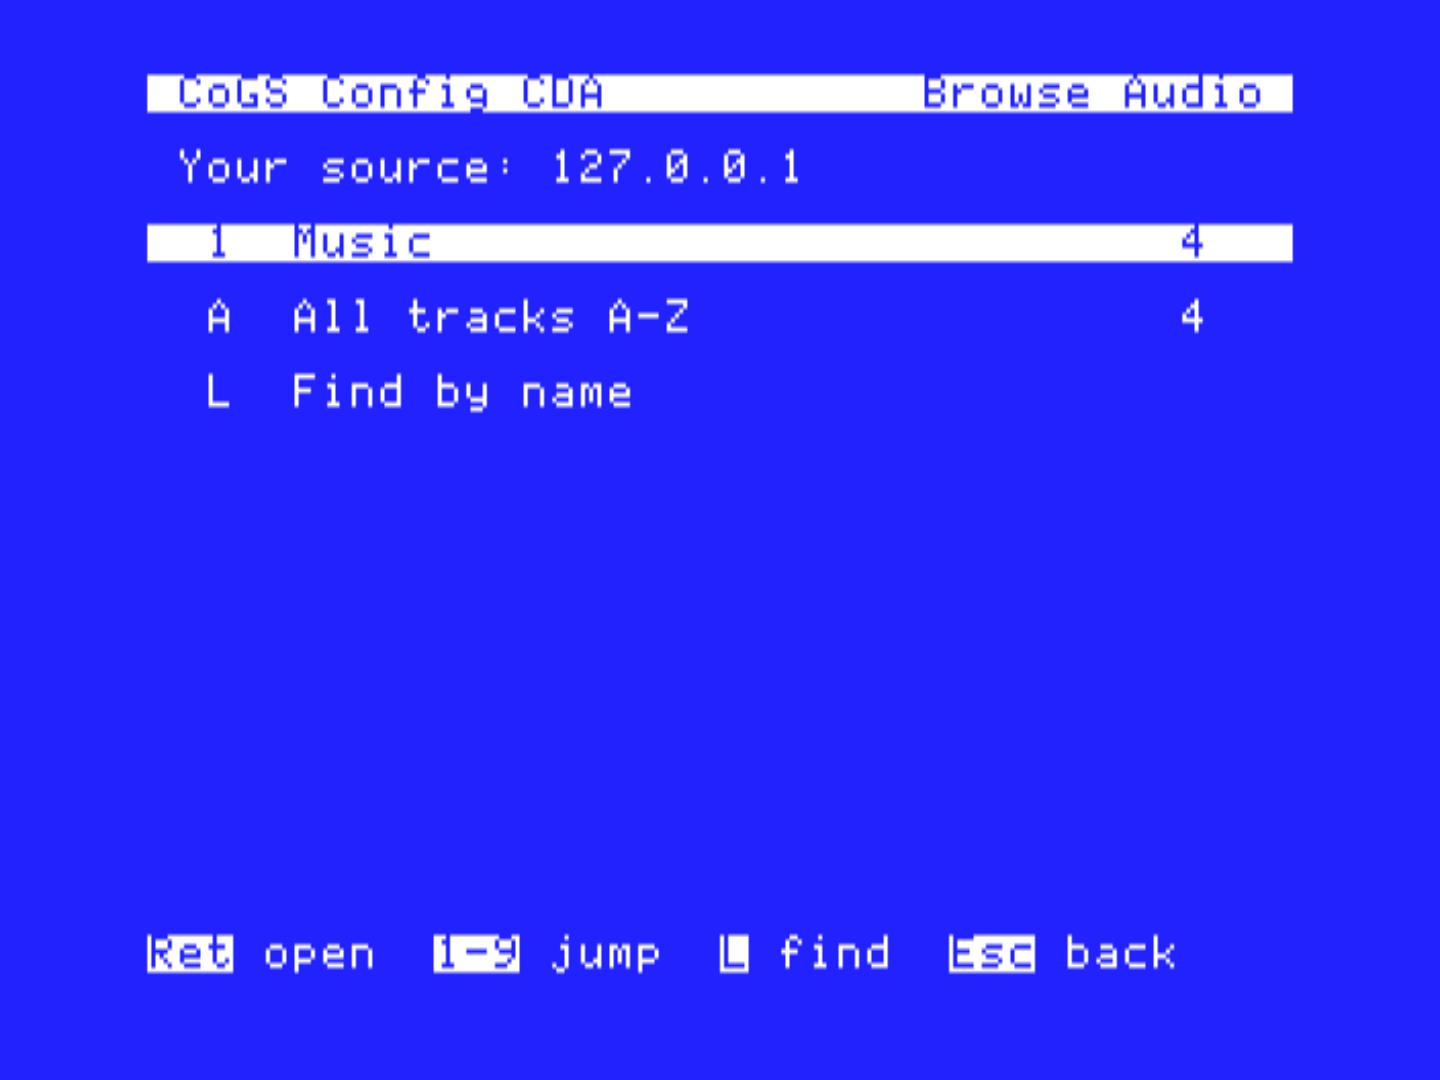
PCM tracks and SoundSmith songs both just play. You do not pick an engine. The list footer tells you PCM is streamed audio and SoundSmith is DOC.
Your own folder uses the same Image Manager share as disks (Chapter 9). Drop an MP3, WAV, or the other formats that chapter lists. Image Manager converts each one to the PCM the player wants. If those files are skipped, open Conversion tools… in Image Manager and Copy the ffmpeg line. Save the share URL on the Audio slot of Image/Audio Source.
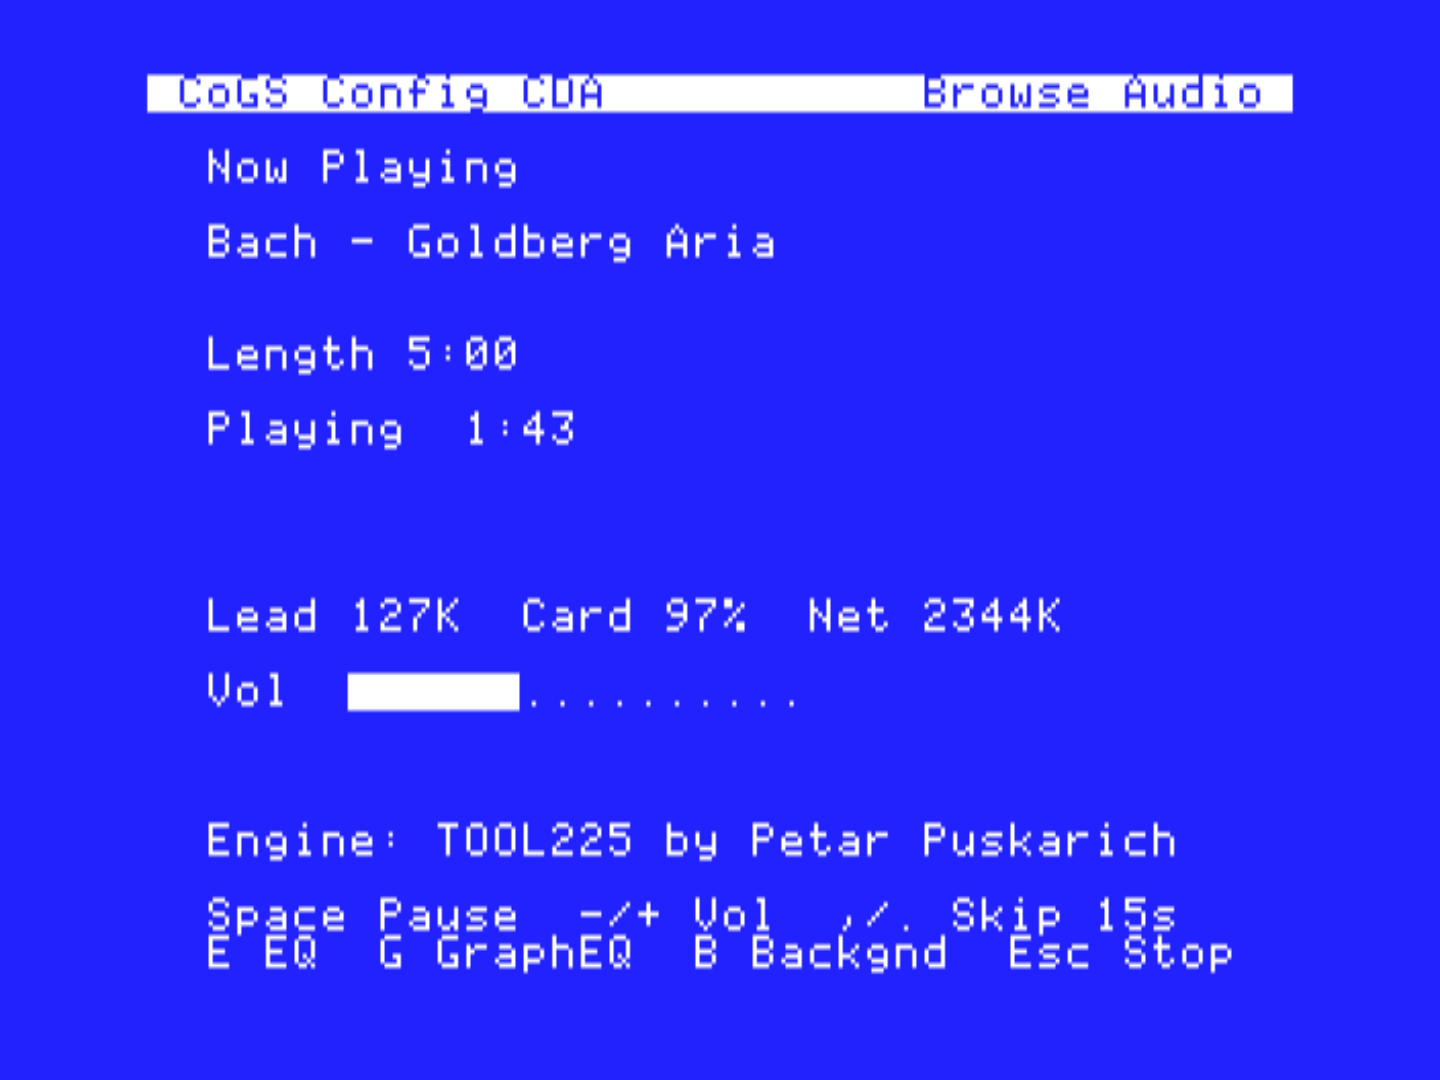
Return on a track starts it. The Now Playing page shows the title, time, and volume bar.
| Key | Action |
|---|---|
| Space | Pause and resume |
| Esc | Stop |
| Plus or minus | Volume, the IIGS system volume |
| N / P | Next or previous in the list or playlist |
| . / , | Skip about 15 seconds, catalog tracks |
| B | Keep playing after you leave the desk accessory |
| E | Bass and treble |
| G | Graphic equalizer |
Mark tracks in the list and press Return to play the marked set in list order, or S to shuffle that set.
The card’s + and - keys are the same volume the IIGS Control Panel uses. A change you make here is the system volume.
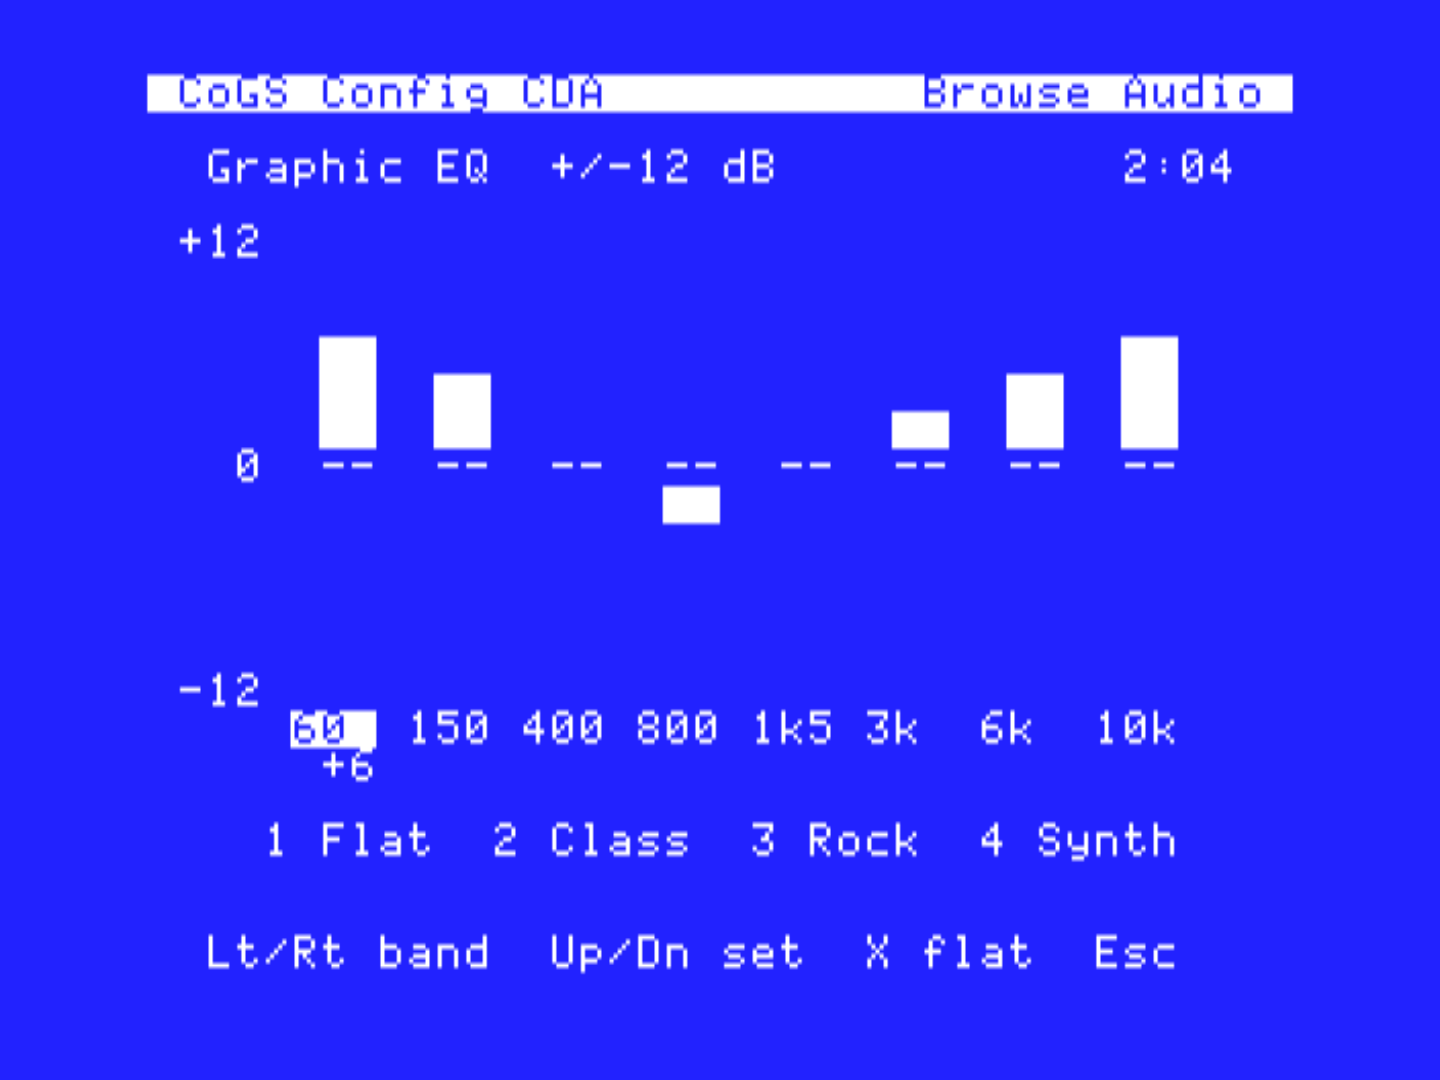
E opens bass and treble. G opens eight bands from 60 Hz to 10 kHz, each in 2 dB steps. Esc leaves the equalizer and keeps the settings for the session.
Play forces the IIGS to Fast for the session and puts your System Speed back when you stop. Leave System Speed on Fast if you want the rest of the machine that way too.
Stereo tracks play in stereo when a stereo card is present and the machine is fast enough. On a stock IIGS, high-rate stereo is mixed down to mono so it does not drop out. An accelerator keeps real stereo.
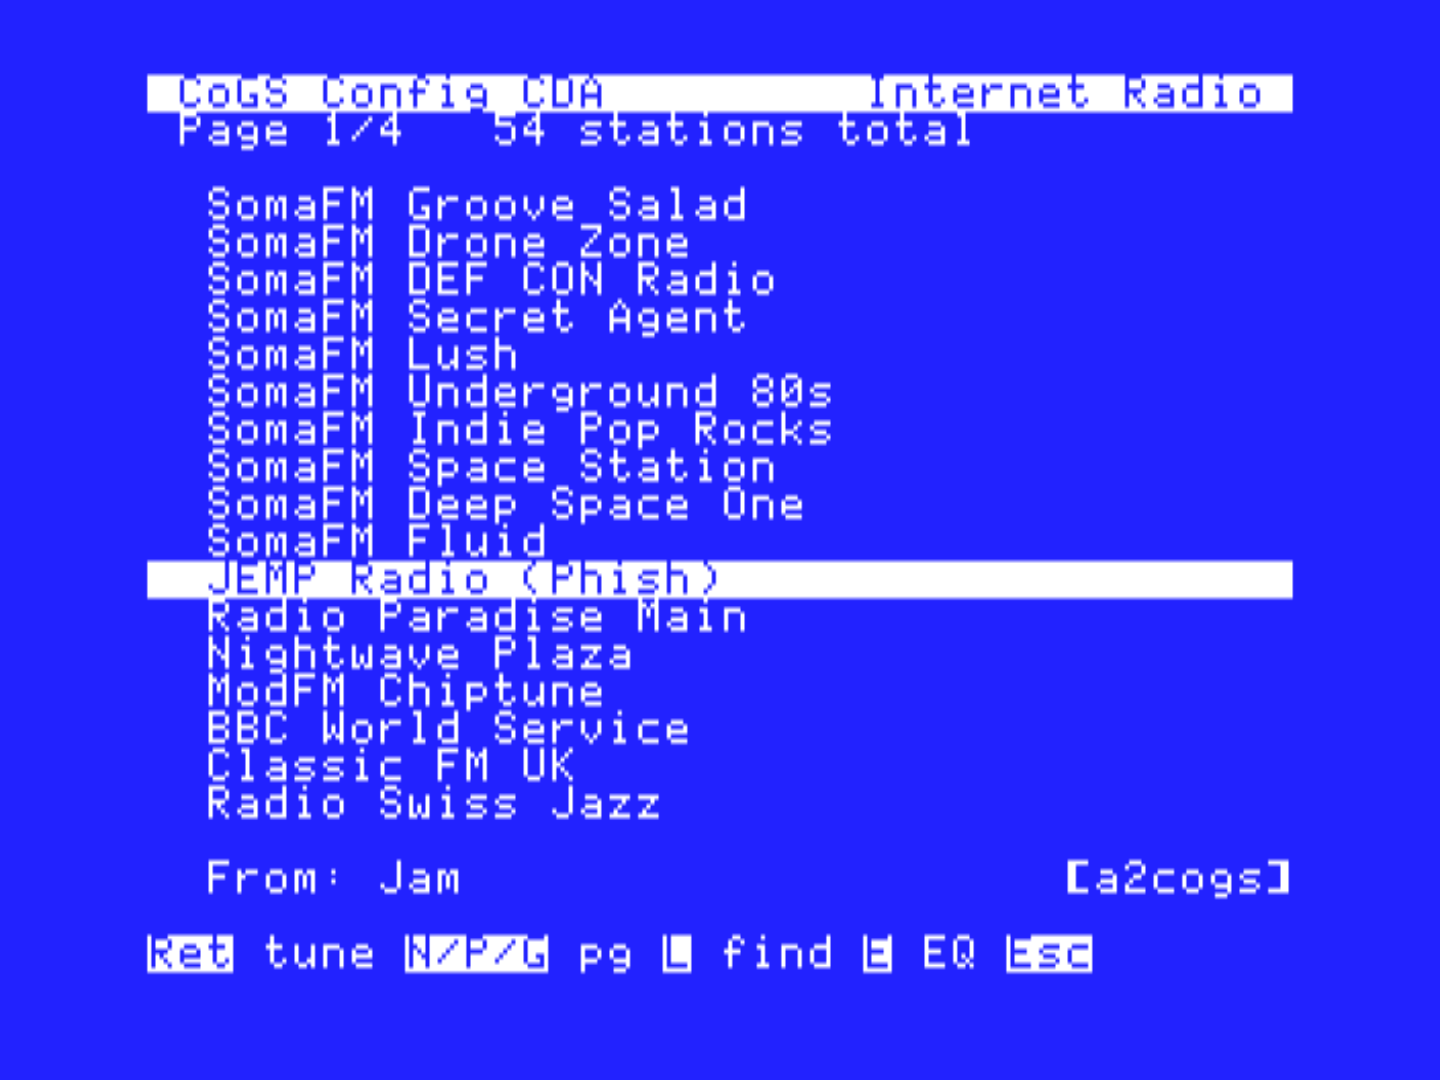
R on the audio hub opens the station list. Search from that list. Play is the same Now Playing page. The card decodes the stream. Buffering shows as the load bar filling before sound starts.
B from Now Playing leaves CoGS Config and keeps the music going. Open CoGS Config again and you land on Now Playing, not the hub. S or Esc stops. A program that takes the sound chip for itself will interrupt playback. Stop from the player before you launch something that needs the Ensoniq.
Programs that call Tool 226 (PCM) or Tool 219 (SoundSmith) work on a boot disk that does not have those files, once the card has loaded them. They stay in memory until restart. You do not copy them onto every boot volume.
The card serves box art and title screens for the disks in the catalog and shows them on the IIGS in Super Hi-Res, HGR, and double hi-res. This chapter covers viewing the picture for a disk, browsing the picture catalog, and running a slideshow.
Pictures, like audio, are IIGS only and run from CoGS Config after the Finder is up. The Browse Pictures row is not on the card’s startup menu. Wait about ten seconds, then Ctrl-OpenApple-Esc and choose CoGS Config. Press 5 for Browse Pictures.
From Browse Disks, press V on a row that shows a V. The still opens in the viewer. Esc or Return leaves it and you are still in Browse Disks.
That is the fast way to see whether a title is the one you meant, without leaving the disk list.
Browse Pictures opens on What do you want to see?
| Key | Shelf |
|---|---|
| B | Box art |
| T | Title screens |
| S | SHR 320 by 200 |
| H | HGR 280 by 192 |
| D | DHGR 560 by 192 |
| A | All pictures A to Z |
| L | Find by name (searches the a2cogs catalog) |
| Y | Your source, when you have saved a pictures URL |
| M | Misc scanned images, by week |
Y opens on the share’s folders that hold pictures, then All pictures A-Z and Find (Chapter 9).
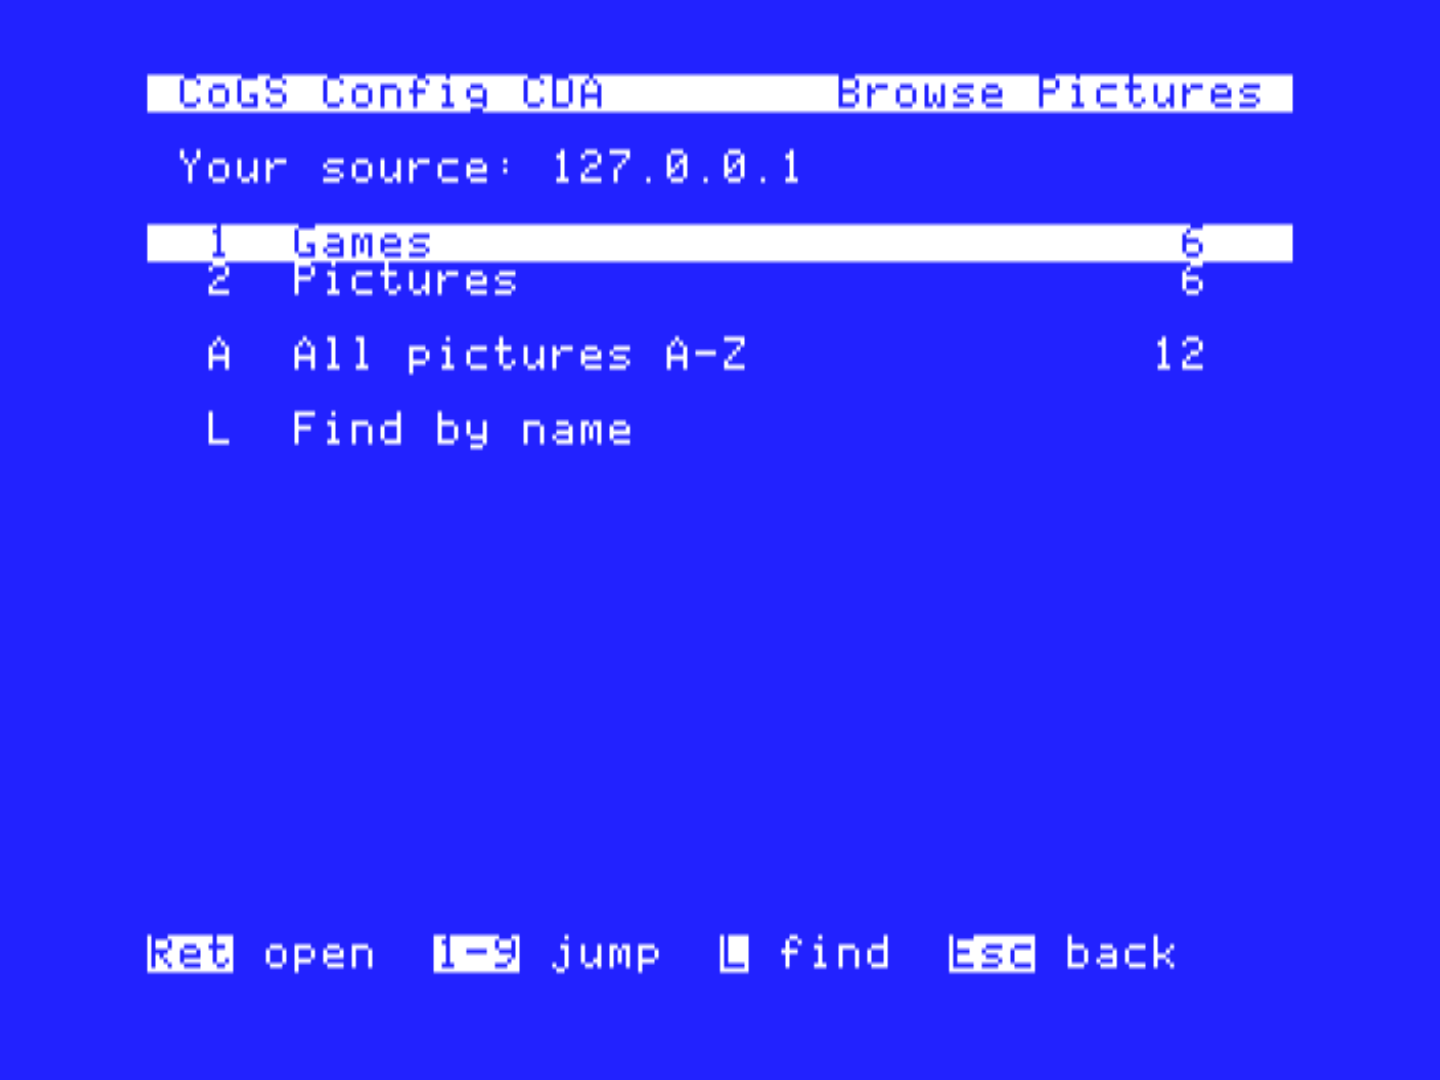
Return or V opens the still. N and P walk the list. Esc returns to the list.
M is its own store (scanned pictures grouped by week), not part of Find or the A to Z index. Open a week, then N or P to the next week. L from the week list searches every week.
Mark stills in the list, then S. The show walks the marks. Esc stops it and puts you back on the list.
The viewer speaks SHR, HGR, and DHGR. Those are the three format rows on the hub. 3200-color stills are not shown. An 8-bit machine does not have this menu.
Your own stills use the same Image Manager share (Chapter 9). Drop a
JPEG, PNG, or the other formats that chapter lists. Image Manager
converts each one to a 320 by 200 SHR. If those files are skipped, open
Conversion tools… in Image Manager and Copy the python3
line. Save the share URL on the Pictures slot of Image/Audio
Source. Native .shr files go through as-is.
On an Apple IIGS running GS/OS the card is also present on the desktop. This chapter covers CoGS Config, the CoGS device in the Control Panels window, the CoGS Status desk accessory, and using the card as the network interface for Marinetti.
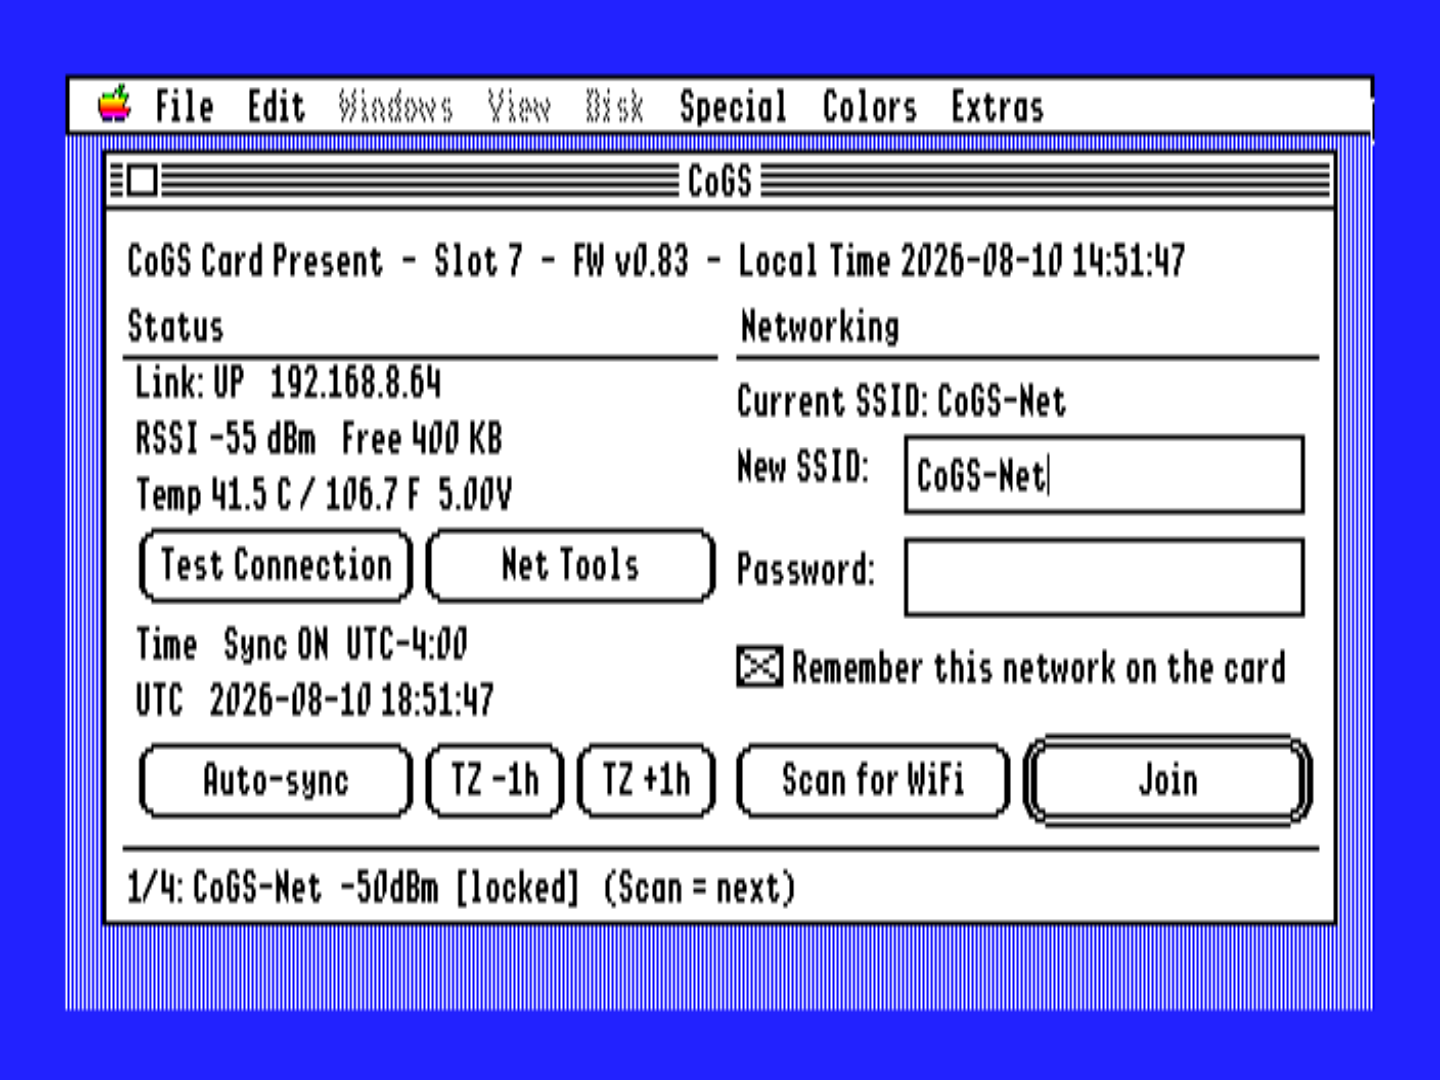
The card installs a classic desk accessory named CoGS Config. It is not a file on the boot disk. About ten seconds after the Finder desktop settles, it appears in the Desk Accessories menu (Ctrl-OpenApple-Esc).
If you open that menu too early, CoGS Config is not there yet. Leave the menu, wait at the desktop, and open it again. Sitting in the Desk Accessories list will not install it. The card needs the machine to be polling the slot, and the list is a modal that stops that.
The pages inside CoGS Config are the same card menu as Chapter 4, plus play for audio and pictures. Use this face for Browse Audio, Browse Pictures, Network Tools, and everyday disk work while GS/OS is up.
Warning
An older file named COGS.CDA (“CoGS Config Console”) in
System:Desk.Accs predates the card-installed accessory.
Delete it. Two CoGS entries in the menu fight each other, and the file
one is the obsolete face.
The CoGS CDev lives in System:CDevs on
a boot volume. It is a file. The ready-to-boot disk
cogsall.2mg already has it. The install kit
cogsutil.2mg has it for copying onto your own boot disk.
Read.Me on the kit lists the destinations.
Open Control Panels from the Apple menu and choose CoGS. The panel is the GS/OS home for status and a few settings. You do not need it for the card to work. CoGS Config is enough for disks, audio, and Wi-Fi.
CoGS Status is a new desk accessory in the Apple
menu, file type for System:Desk.Accs. It is a small
live-status window (link, address, clock) over whatever you are running.
Config stays in CoGS Config or the CDev.
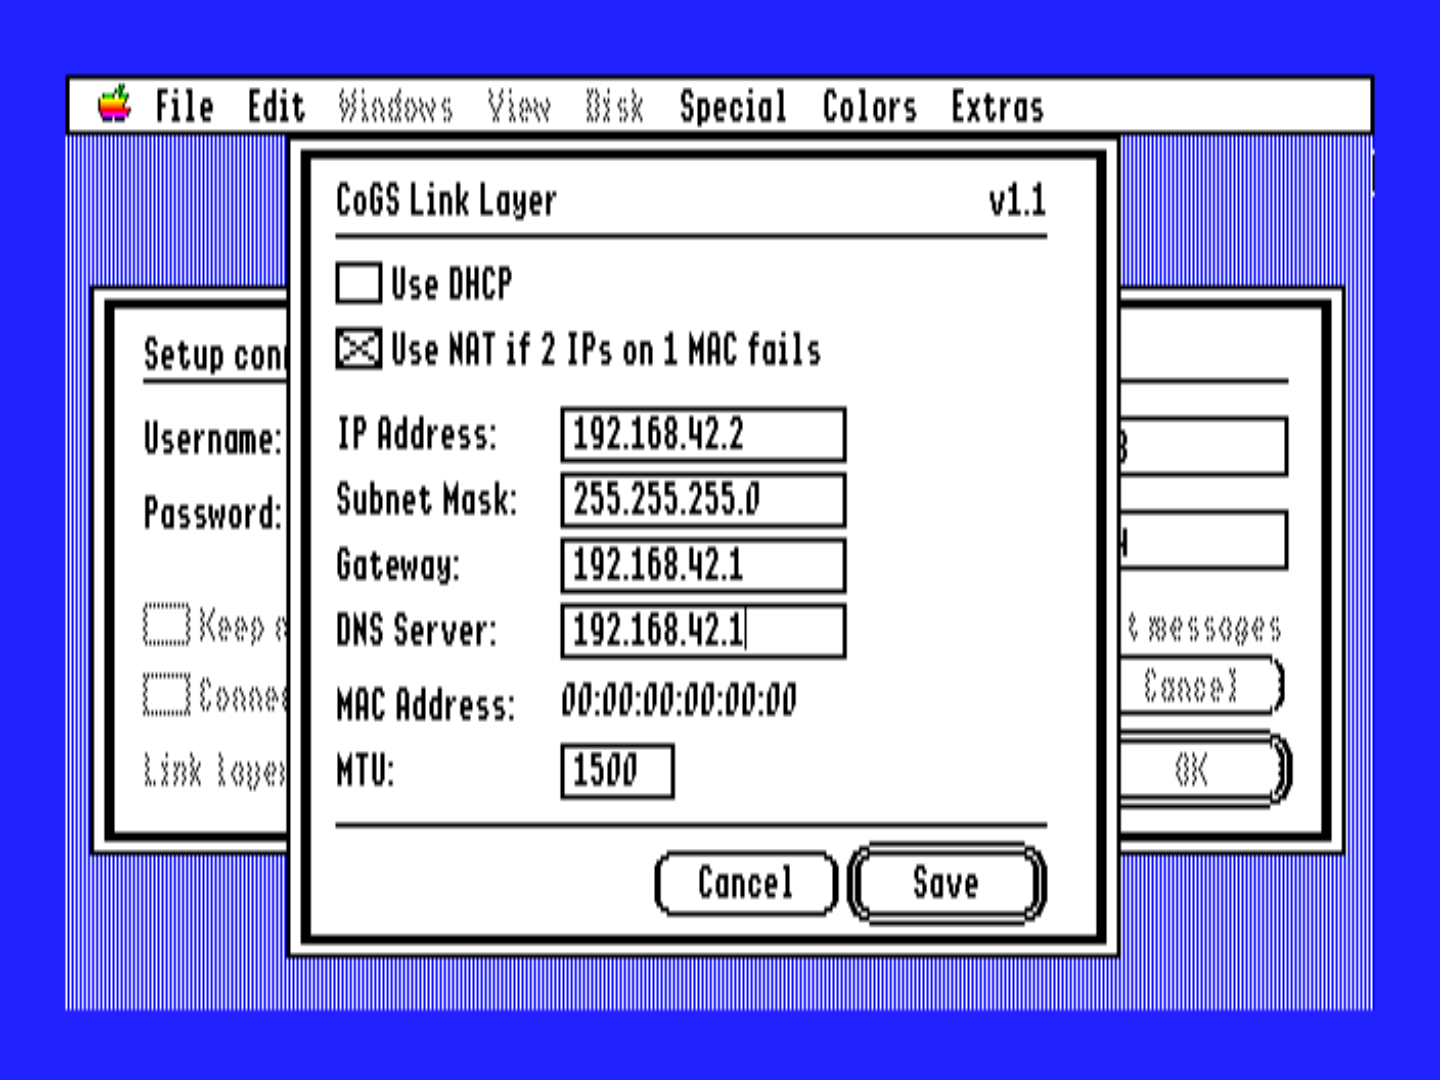
The card is a slot-native alternative to an Uthernet II for the Marinetti TCP/IP stack. Existing Marinetti programs then run over the card.
System:TCPIP from
cogsall.2mg or the install kit.The IIGS gets its own address on the LAN (the card is a second host). Card Status shows an LL line with that address when the link layer is up.
Warning
Give the GS a different address from the card. If both use the same numbers, each stack resets the other’s connections. DHCP on both, or a static on the GS that is not the card’s static, is fine.
Spectrum, browsers, mail, and other Marinetti programs then use the card. They do not need a change.
cogsall.2mg from the Downloads page is a GS/OS volume
with the CDev, the Status NDA, and the Marinetti link layer already in
place. Boot it from the card (Browse, or a saved boot disk). The card
still installs CoGS Config itself. You do not add a CDA
file to that disk.
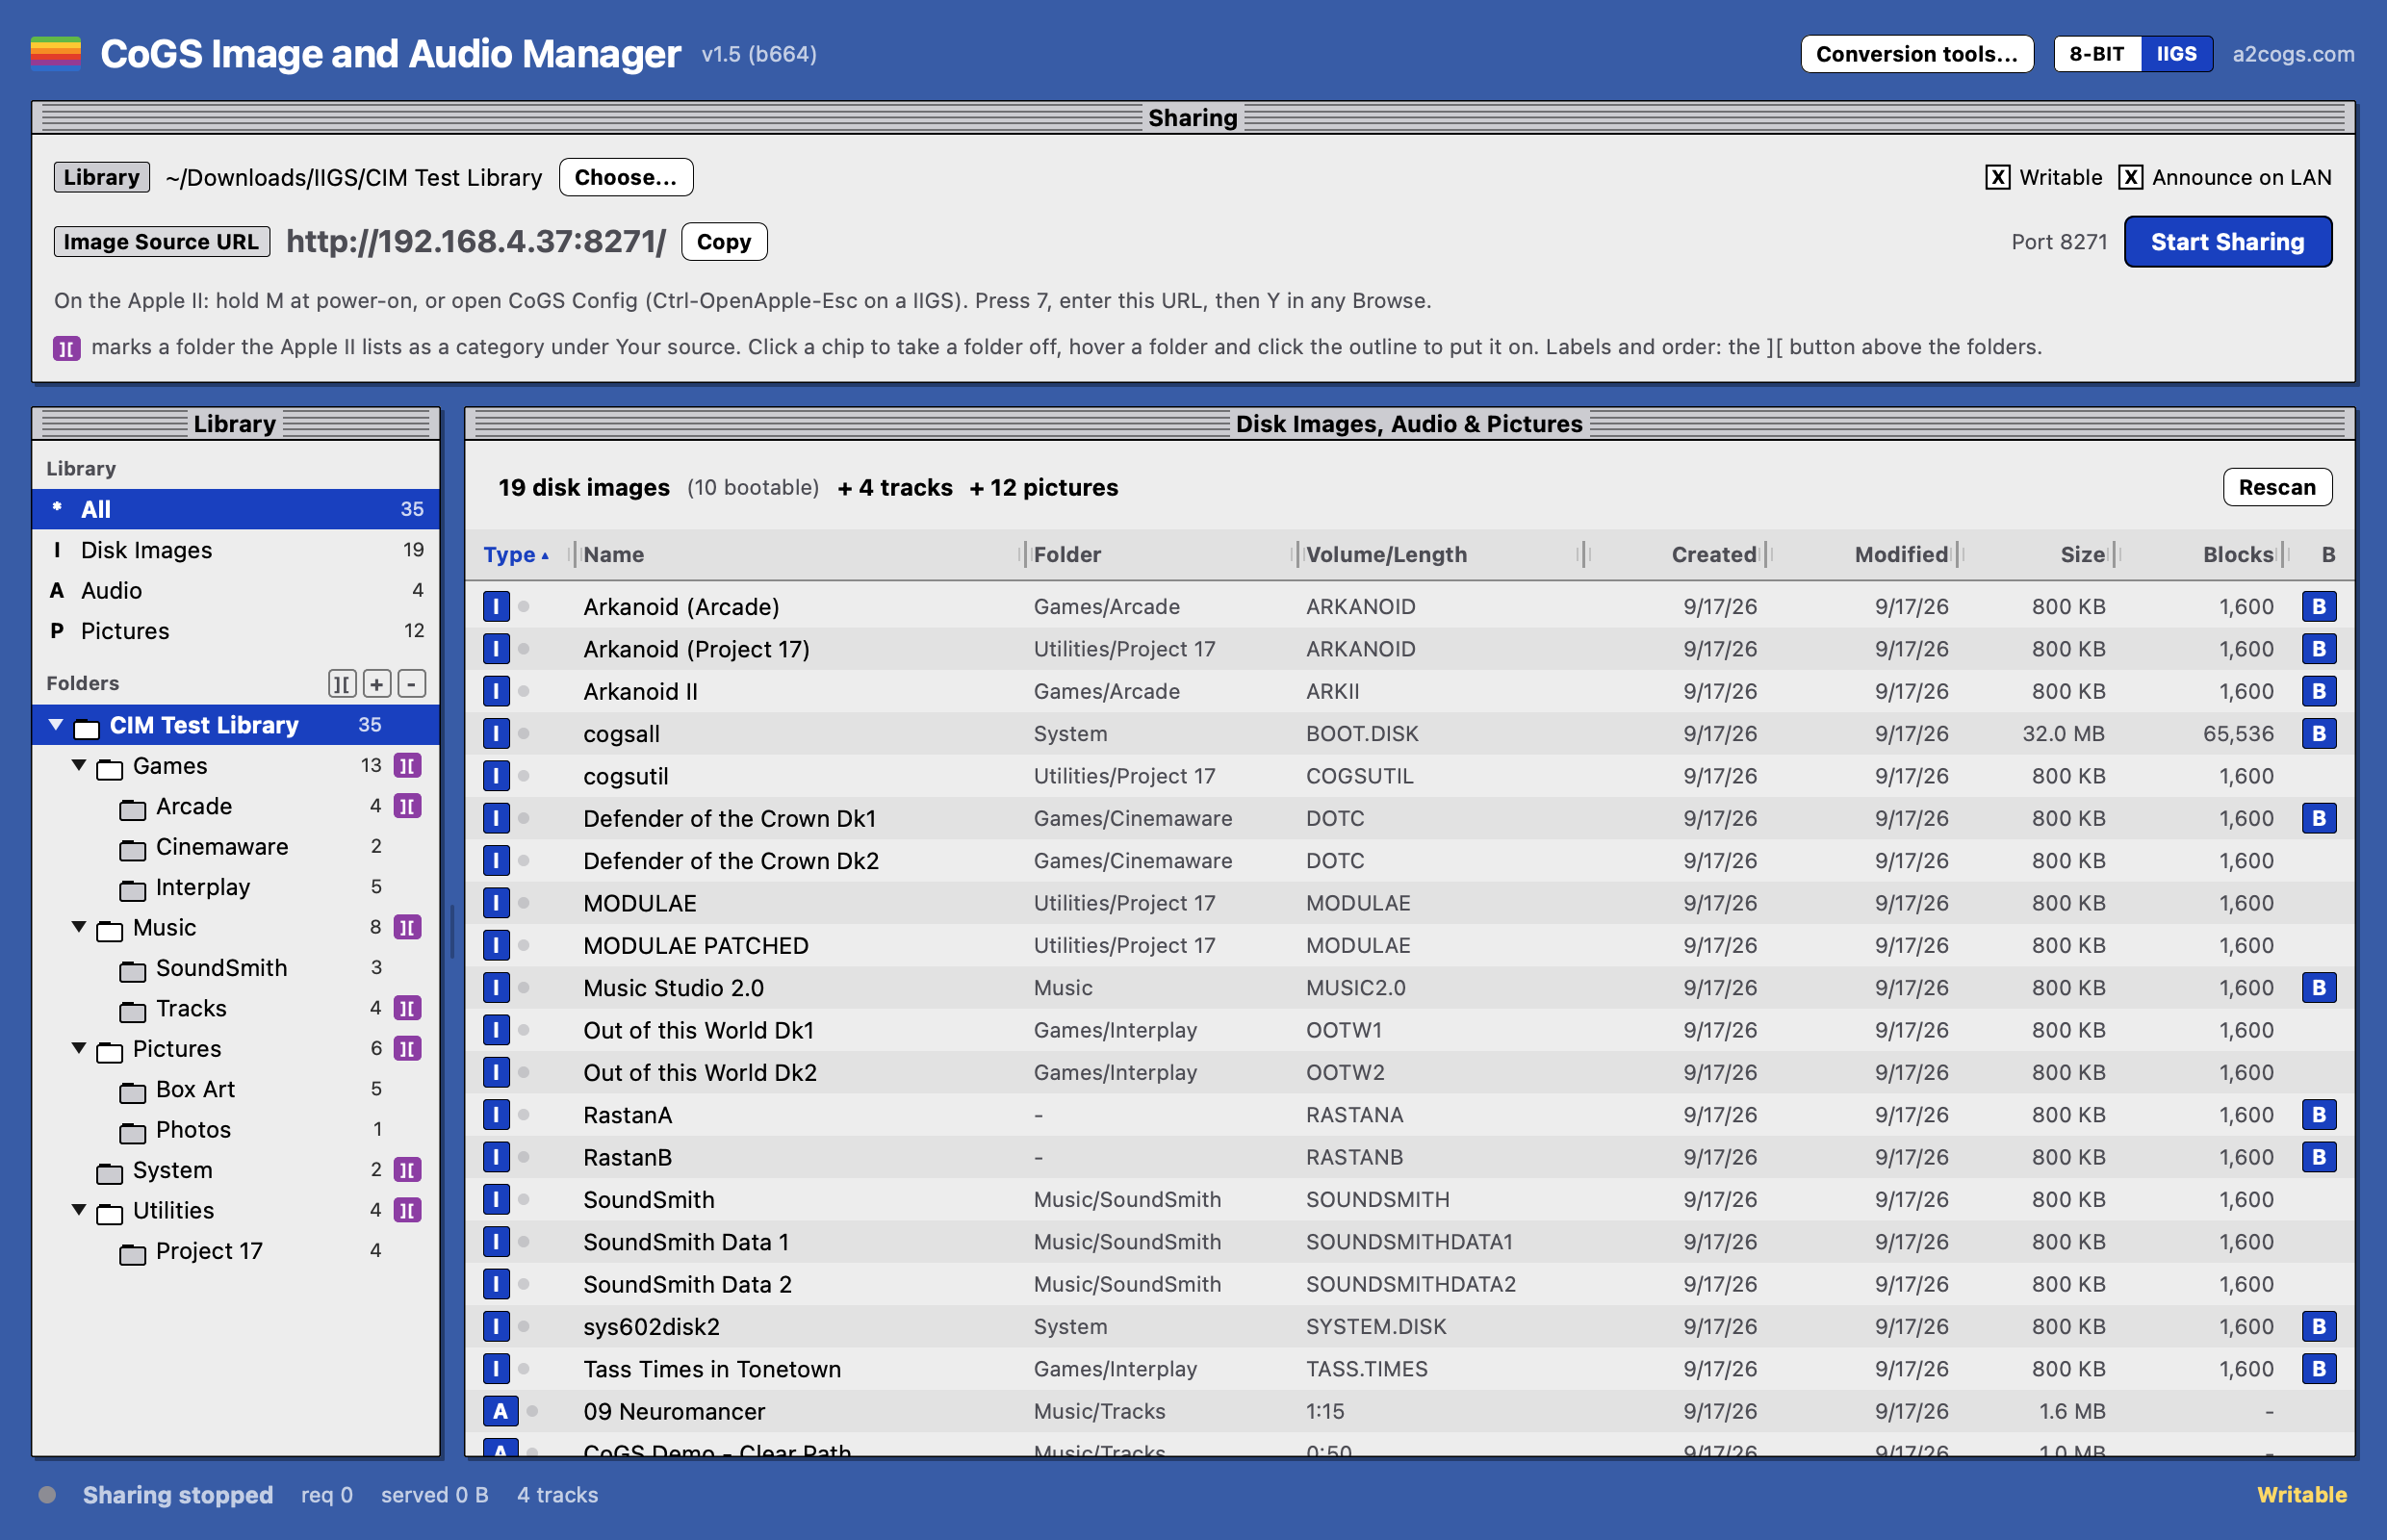
The CoGS Image Manager is a program for your Mac that shares one folder, subfolders included, with the card over your local network. The folder can hold three kinds of files: disk images, audio, and pictures. Image Manager converts the modern audio and picture files so CoGS Config can play and show them. Disks appear under Browse Disks, tracks under Browse Audio, stills under Browse Pictures, all as Your source.
Download CoGS Image Manager from a2cogs.com (the
Downloads page points at the current build). Open the .app.
There is no installer and nothing is copied into
/Applications unless you drag it there yourself.
The first time macOS may refuse an unidentified developer. Control-click the app, choose Open, then Open again.
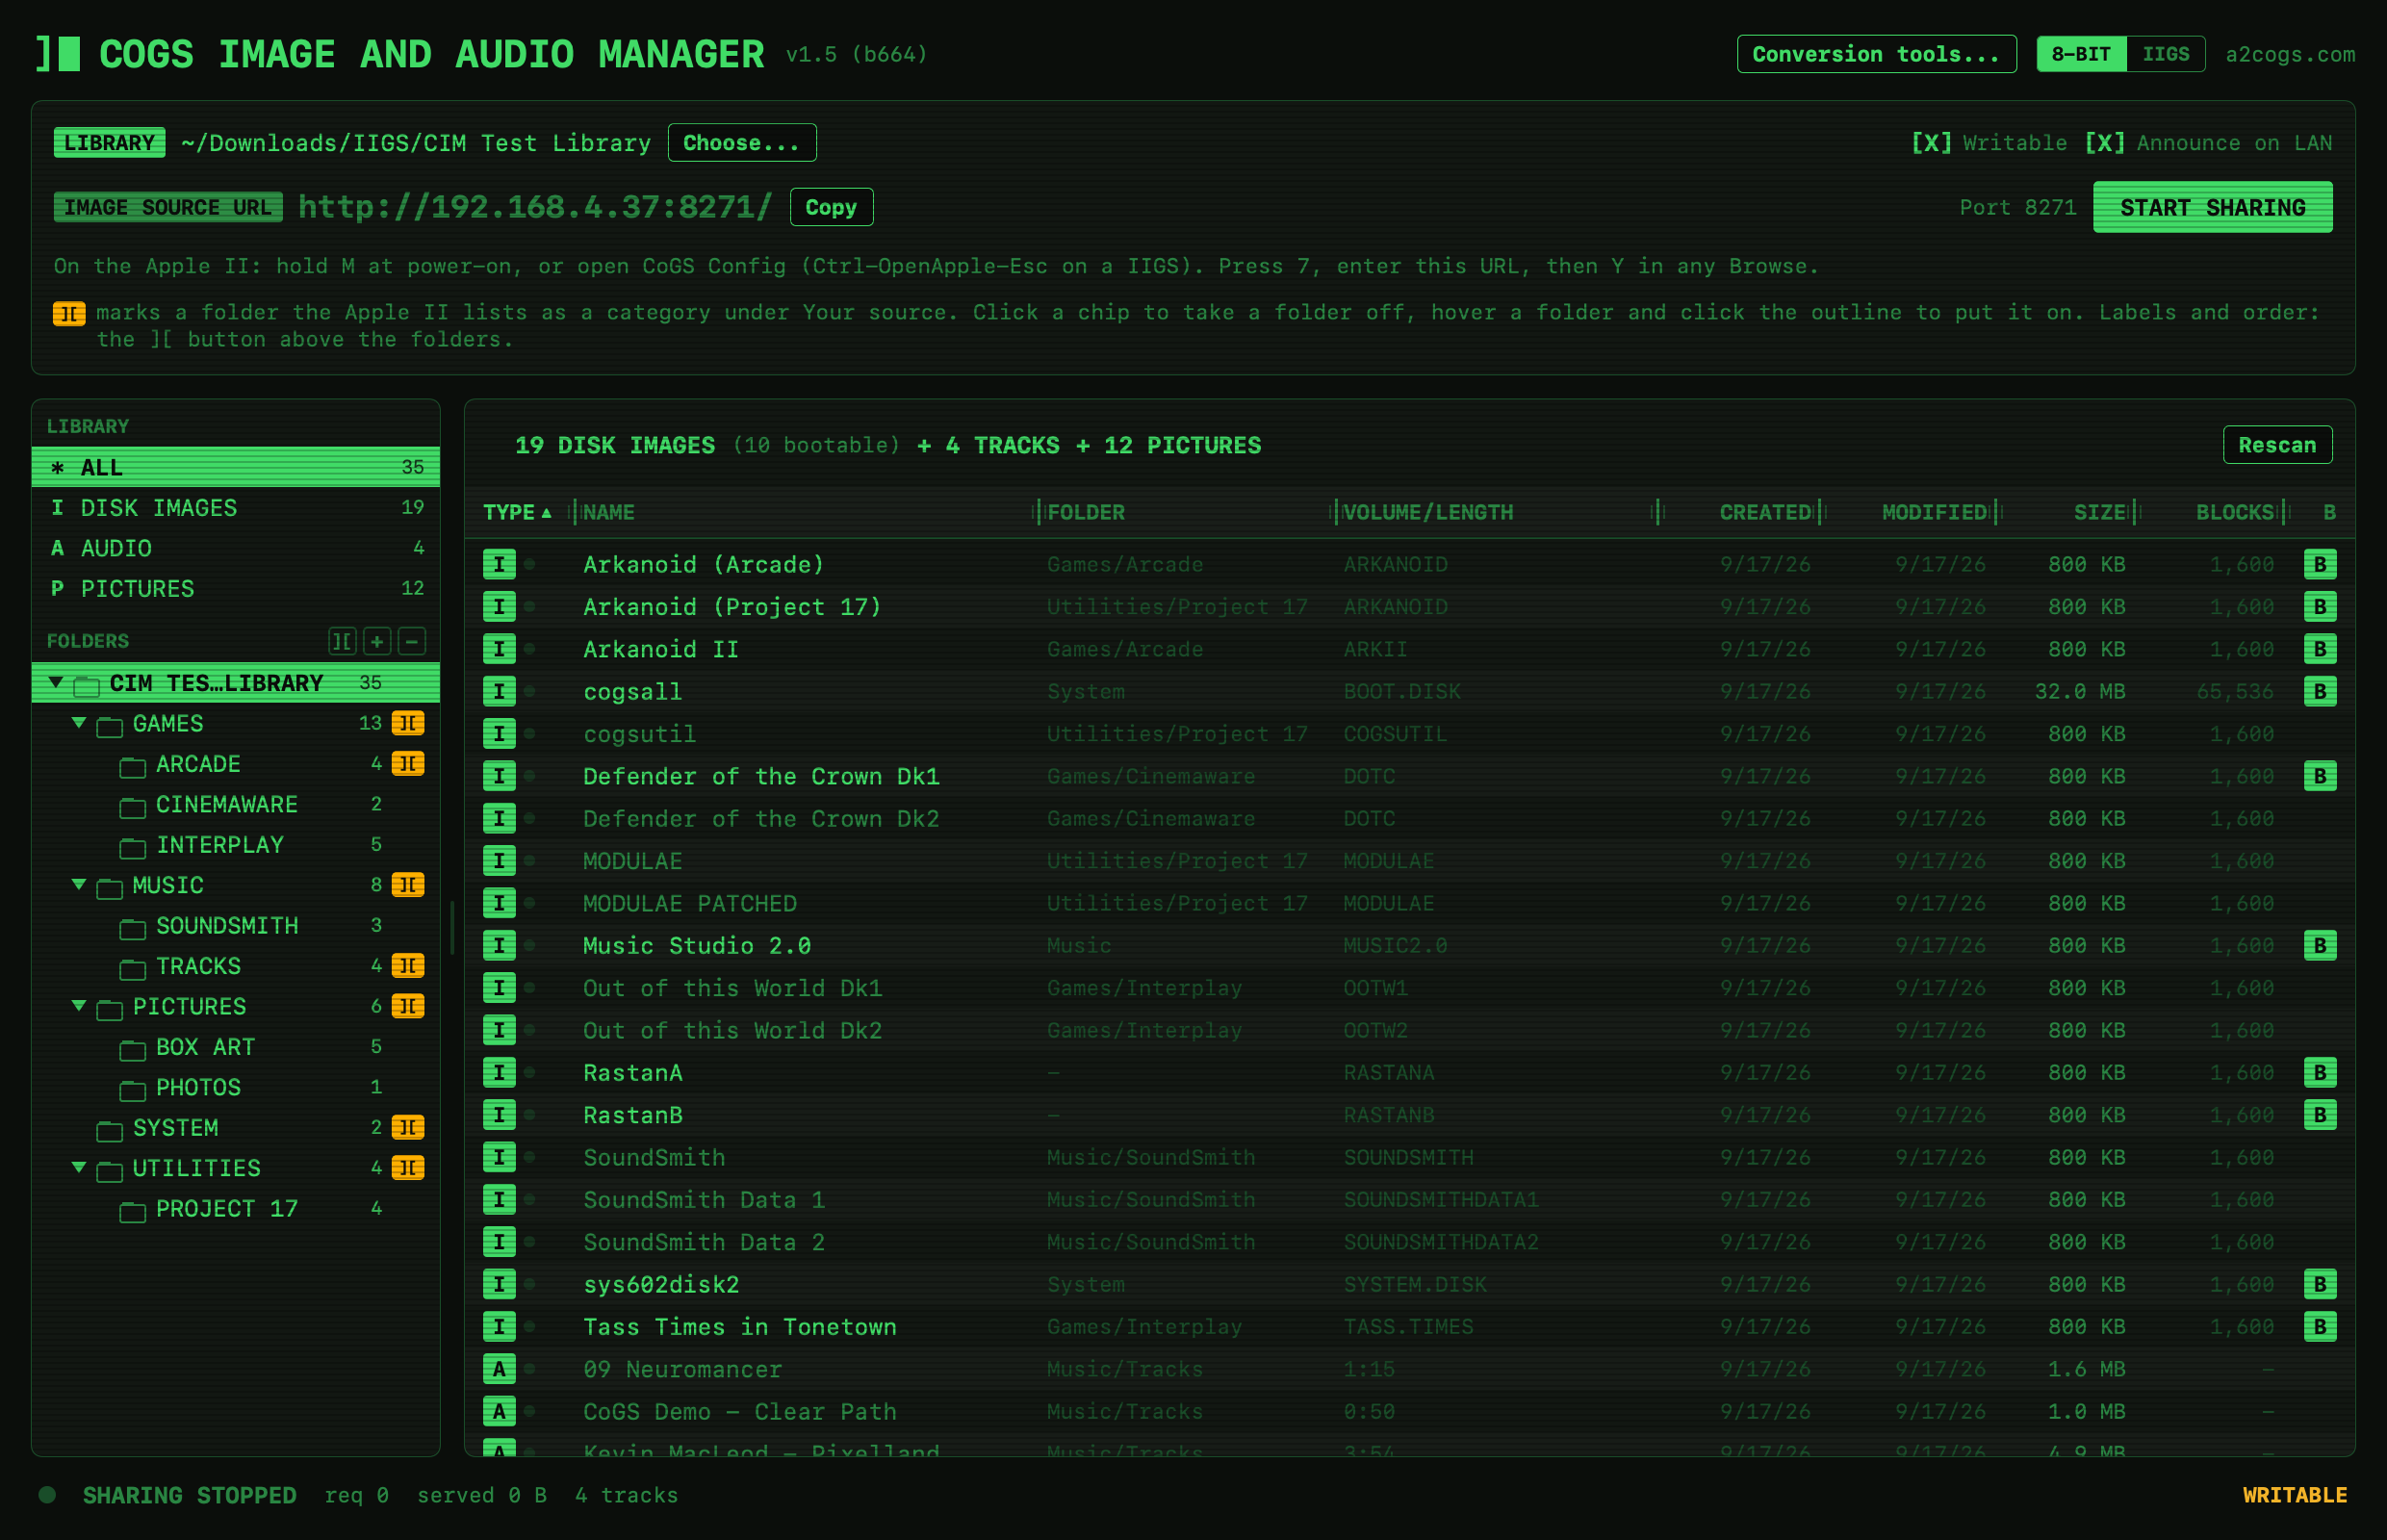
The window has two looks, switched with the 8-BIT and IIGS buttons in the title bar. IIGS is the platinum Finder look; 8-bit is green phosphor text on black, in the style of a II+ or IIe screen. The choice is appearance only and is remembered between launches. Nothing about what is shared or how the card sees it changes.
Disk images work with no extra software. Audio and picture conversion use tools on the Mac. Image Manager does not install those for you. It shows a Conversion tools sheet with the commands and a Copy button.
Open Conversion tools… in the title bar, or Help > Conversion Tools. The sheet also opens the first time you launch Image Manager if ffmpeg or the picture converter is missing. Yellow skip lines in the file list open the same sheet.
Each row is Ready or Need. Copy the Need line, paste it in Terminal, wait until that command finishes, then click Recheck. You do not have to quit Image Manager. Disks stay Ready with nothing extra.
Image Manager looks in /opt/homebrew/bin and
/usr/local/bin first, so Homebrew’s copies are the ones it
will see. Apple’s /usr/bin/python3 is skipped. It is often
a stub that asks for Xcode.
The sheet copies this:
/bin/bash -c "$(curl -fsSL https://raw.githubusercontent.com/Homebrew/install/HEAD/install.sh)"When it finishes, follow the “Next steps” it prints so
brew is on your PATH (on Apple silicon that is usually two
lines that add /opt/homebrew/bin to
~/.zprofile). Open a new Terminal window, then Recheck.
brew install ffmpegRecheck. The yellow line for skipped mp3/wav should be gone, and those files convert to PCM.
brew install python3 && python3 -m pip install numpy PillowRecheck. The yellow line for skipped jpg/png should be gone, and those files convert to SHR.
Tip
The sheet also has one line for both conversions after Homebrew is installed:
brew install ffmpeg python3 && python3 -m pip install numpy PillowThen Recheck.
Without ffmpeg, only .pcm audio is shared. Without
python3 plus numpy and Pillow, only .shr pictures are
shared. Disks are not affected.
http://192.168.1.50:8271/.The program builds the catalogs the card already understands. Bootable disks get a B in Browse. Writes go back into existing disk images only. Read-only is a checkbox if you do not want that.
The sidebar lists the library by kind (All, Disk Images, Audio, Pictures) and then your folders, as they are on disk. Click one to see only that part; the card always gets the whole library as one A-Z list per kind. If two disk images in different folders would show the same name, the one in the subfolder gets the folder in parentheses on the Apple II, so “Work Disk” and “Work Disk (Project 17)” stay apart. Find on the card matches folder names too.
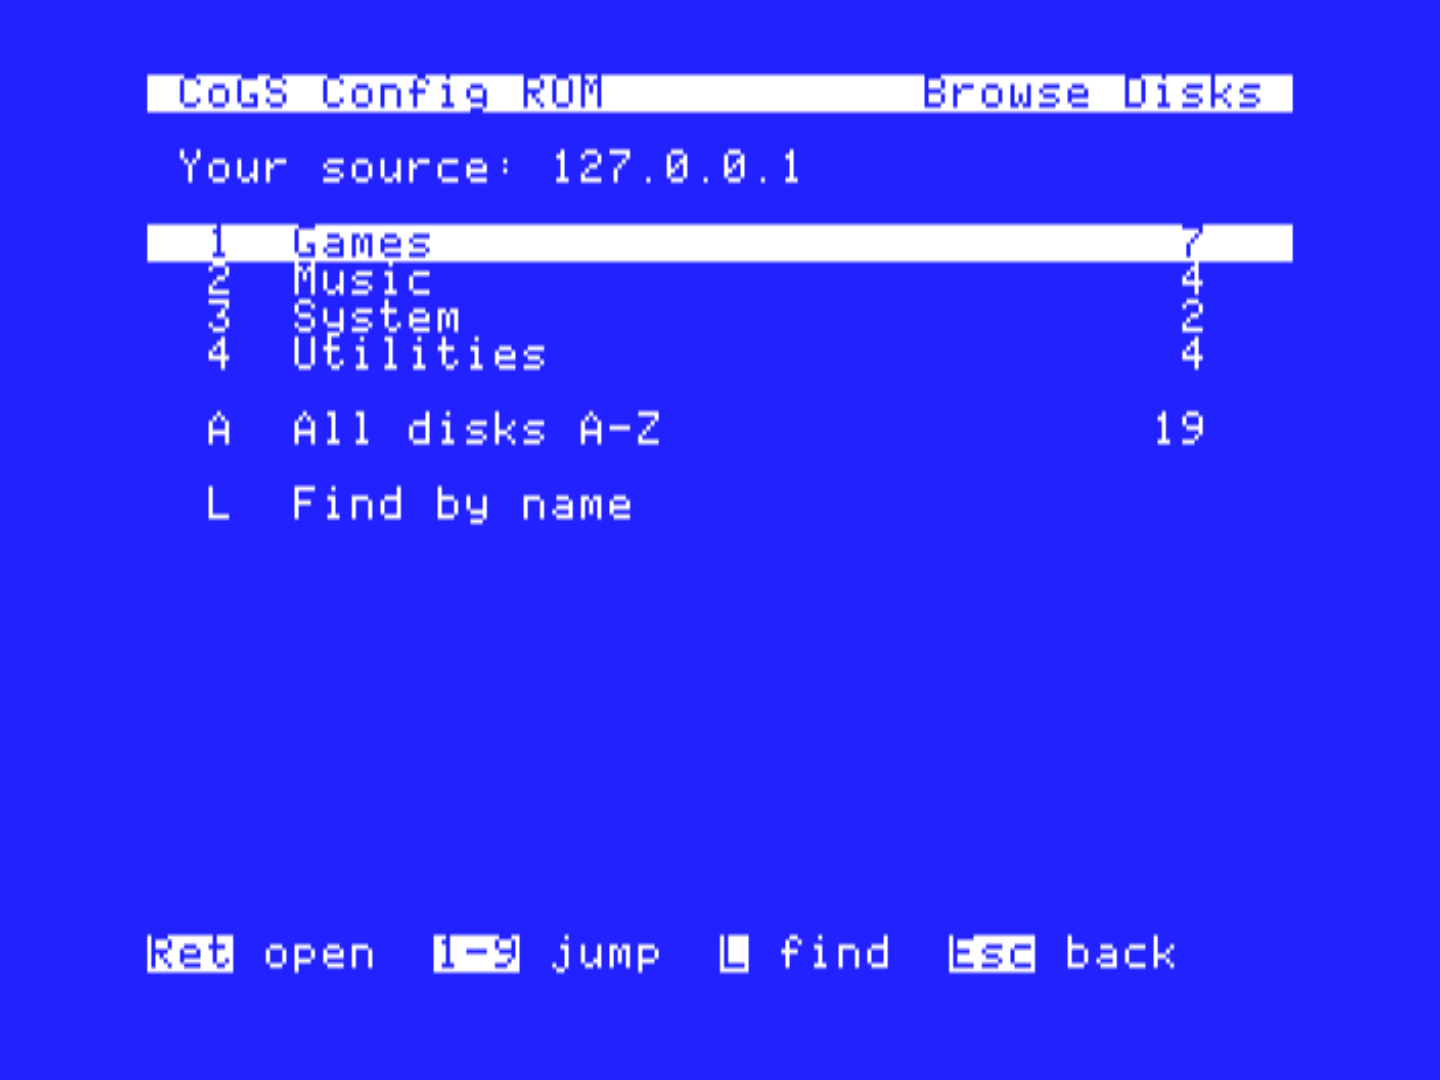
Your folders can be categories on the Apple II. Press Y on any Browse
hub and Your source opens on them, one row per folder with a count, then
All A-Z and Find by name. Rows are
numbered 1 through 9, then 0, X, Z; the number opens the row, Return
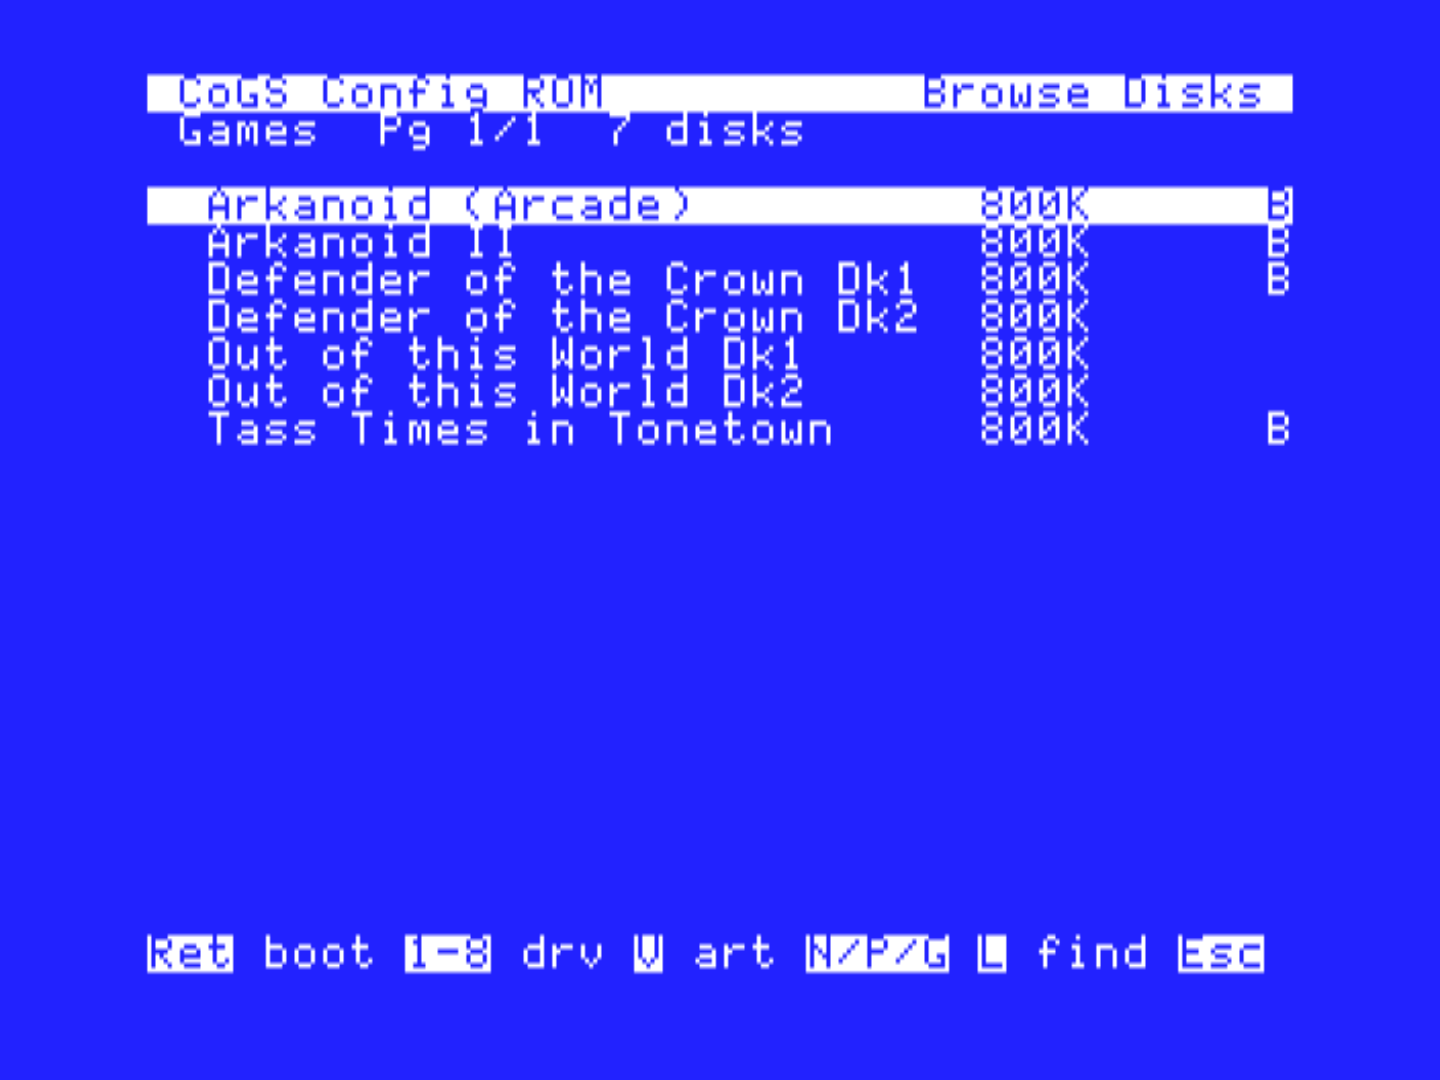
opens the highlighted one. A folder lists everything in it and below it,
flattened, so Utilities/Project 17/Disk 1 sits under
Utilities. Only folders that hold that kind of file appear, so a folder
of pictures is on the Pictures hub and not the Disks hub. Esc from a
list returns to your folders; Esc again returns to the a2cogs.com
hub.
Out of the box every top-level folder is a category and deeper
folders are not. The purple ][ chip in the sidebar marks
the folders the card will show. Click a chip to take that folder off;
hover a folder without one and click the outline to put it on.
Right-click a folder for the same switch.
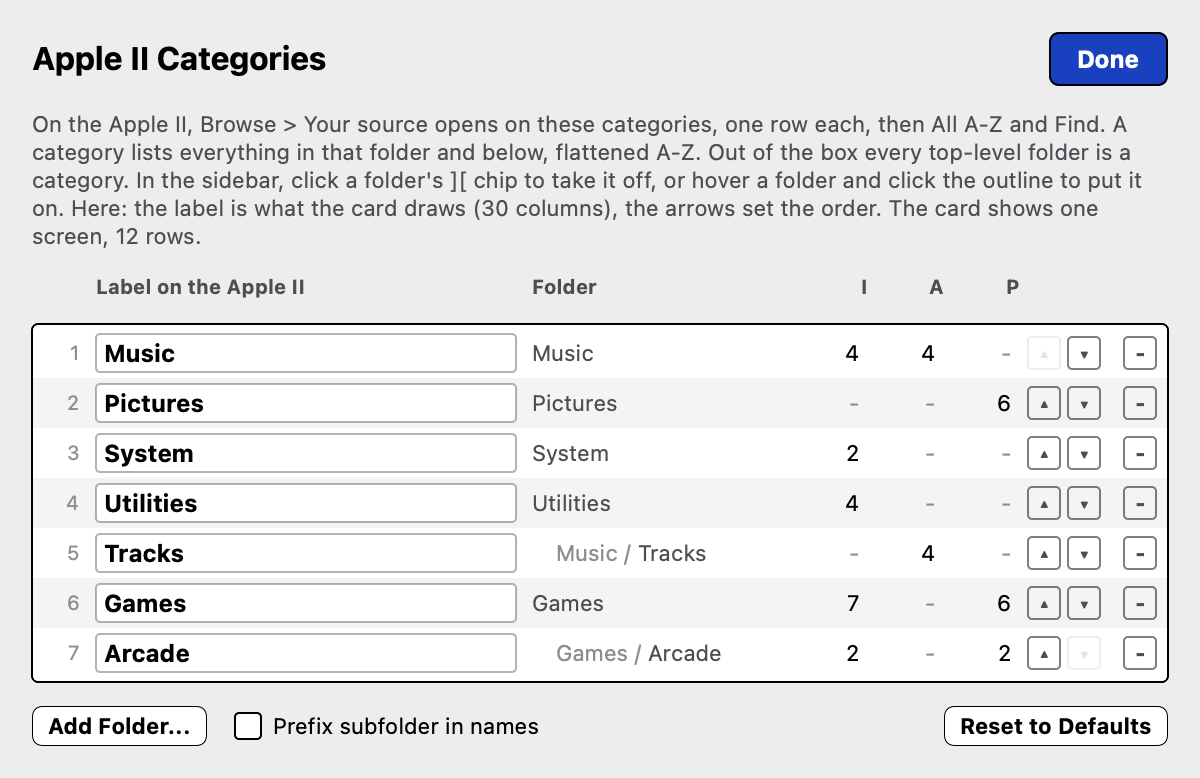
Apple II Categories (the ][ button
above the folder list, or Help > Apple II Categories) is the full
list. Each row has the label the card draws, prefilled with the folder
name, so type over it to rename (“Project 17” can read “Work”). A
renamed folder shows its label in quotes beside the folder name in the
sidebar. The up and down buttons set the order the card shows,
Add Folder brings in a nested folder, and
Prefix subfolder in names makes items below a category
carry their subfolder (“Project 17: Disk 1”). The card shows twelve
rows, so keep the list to what you reach for; the sheet dims rows past
that. Reset to Defaults goes back to the top-level
folders.
Requires firmware 1.13 or later. Older firmware ignores the categories and Y opens the plain A-Z list.
Right-click a disk image for Show in Finder and Snapshot. Snapshot copies the disk image next to itself with the date and time in the name, a cheap save point before you try something on the Apple II. The small light beside each row is the drive LED: green while the card reads that file, amber while it writes.
If your router renumbers the Mac, the URL the card saved stops answering. The card notices on the first fetch: it looks for the share on the LAN while it waits, and when the share turns up at a new address the page says so and Return re-points every saved slot at it. If nothing turns up (Image Manager not running, or the LAN blocks Bonjour), press S on that page to open Image/Audio Source and scan again. A DHCP reservation for the Mac avoids the question. On the Source page, D, A, and P edit the disk, audio, and picture URLs by hand, and C clears all three.
Note
The share is for your LAN. It is not an internet server. Keep the a2cogs.com catalog for anything you want reachable off your own network.
The card never sees an MP3 or a JPEG. Image Manager turns those into the formats CoGS Config already plays and blits. Conversion happens once on the Mac. The original file stays in your folder. Change the original and Image Manager converts it again.
| You drop in | The card gets |
|---|---|
.2mg |
That disk image, block by block |
.po |
That disk image |
.hdv |
That disk image (same as
.po) |
ProDOS-order images only, up to 32 MB. Image Manager does not translate DOS 3.3 or nibble files. A volume that actually boots gets a B in Browse.
The player wants unsigned 8-bit mono PCM at 21973 Hz, the rate Tool
226 uses. A .pcm file that is already that format is served
as-is.
| You drop in | The card gets |
|---|---|
.mp3 |
PCM, same title |
.m4a |
PCM |
.wav |
PCM |
.aif or
.aiff |
PCM |
.flac |
PCM |
.ogg |
PCM |
.pcm |
Served as-is |
Browse Audio lists the track. Return plays it like a catalog PCM. Stereo sources become mono. The length you see is the PCM length.
The viewer blits a 32712-byte Super Hi-Res still (320 by 200, sixteen
palettes). A .shr file that is already that blob is served
as-is. Everything else is converted to that SHR.
| You drop in | The card gets |
|---|---|
.jpg or
.jpeg |
SHR 320 by 200 |
.png |
SHR |
.gif |
SHR |
.webp |
SHR |
.bmp |
SHR |
.tif or
.tiff |
SHR |
.shr |
Served as-is |
Browse Pictures lists the still. Return or V opens it like catalog box art. The conversion fits the picture into 320 by 200 and reduces it to the IIGS palette. You can tweak saturation, contrast, and dither in Image Manager and reconvert one still without leaving the app.
Image Manager’s share is SHR. HGR and DHGR stills in the a2cogs.com catalog are a different source. Drop those native files on a2cogs, not in this folder, if you want those formats.
The card remembers the sources across restarts. Save a row empty to remove Your source for that kind and go back to a2cogs.com only.
With writes allowed, Finder copies, preference files, and game saves land in the disk image on the Mac. Image Manager will not grow a file and will not create one. If a program needs more blocks than the disk image has, use a larger disk image.
Audio and pictures on the share are not written back. Only disk images accept PUTs.
Back up the folder. A share is as easy to overwrite as a floppy.
Any HTTP or HTTPS server that supports range requests can host files the card already understands (the disk images, the PCM, the SHR). The catalog shape is in the CoGS Technical Reference. For a folder of MP3s and JPEGs on a Mac, Image Manager is the path that does the conversion so you do not have to.
The card’s firmware can be updated from the card’s own menu over the network, or by copying a file to the card over USB. This chapter covers both, and how to see which version is installed.
Settings survive an update. The saved network, disk image and media sources, boot volume, and extra mounts stay.
From the card menu or CoGS Config, press 0 for About / Update. The first status line is the firmware version and its date.
You need a live network.
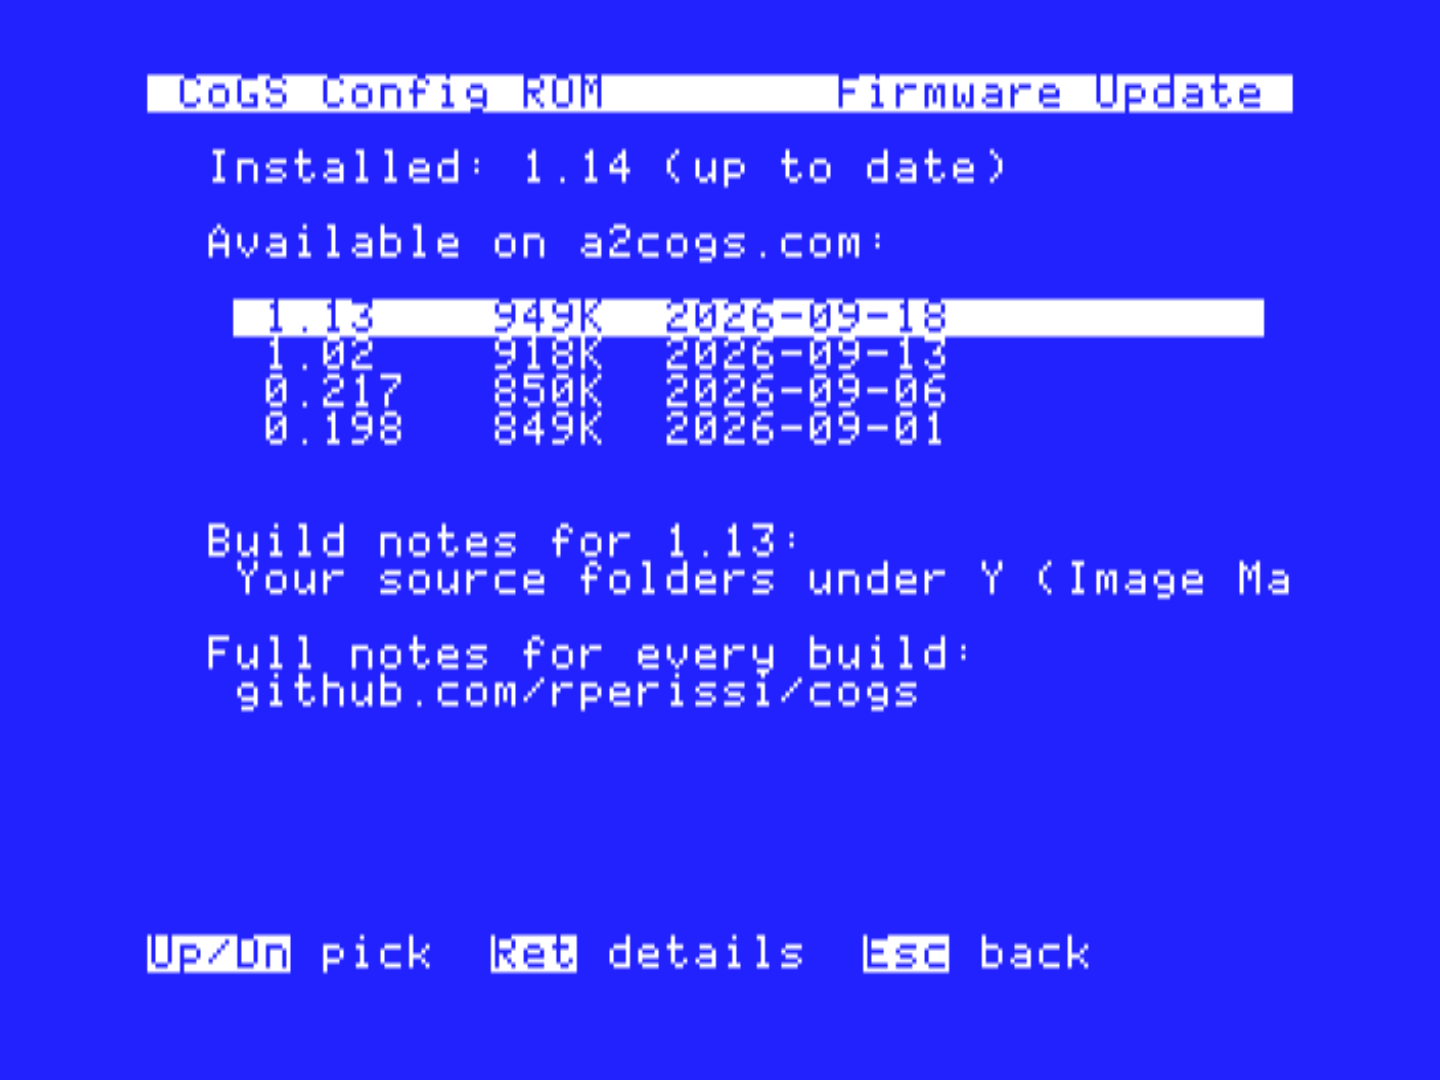
Stay on that page until it tells you to restart the Apple II. A typical update is a few seconds of download and a short write. Esc cancels before the write starts.
The in-menu list is the published builds. A bench build that is not on a2cogs.com will not appear here. Use USB for those.
cogs-<version>.uf2 from a2cogs.com or
the GitHub Releases page. Use the file that matches this card (the
shipping card is the Pico 2 W radio build).RP2350 appears. Copy the UF2 onto
it. The drive closes and the card restarts.Warning
Flash the radio build on this card. A Lite or USB-bridge UF2 uses a different bus map and the Apple II will not see the card.
The card is still the previous firmware if the write never started. Try the menu updater once more after a power cycle.
If the card no longer answers the Apple II after a write, recover with USB and BOOTSEL. Copy a known-good UF2 from the Downloads page. Settings in flash usually survive. If they do not, join Wi-Fi and mount disks again (Chapter 2).
A failed download (network drop) does not reflash. Restart the GS and the card, then retry.
This chapter lists the problems you are most likely to meet, what causes them, and what to do. Start with the first section, which covers the checks that solve most problems.
| What you see | What to do |
|---|---|
| IIGS starts from another slot | Set Your Card and Startup Slot. Restart. |
| No menu when you hold M or C | Reseat the card. Confirm the slot number.
Try PR#n on a //e. |
| Menu appears, About shows no version | Power cycle the computer. If it stays blank, recover firmware over USB (Chapter 10). |
| GS/OS desktop, no CoGS drives | The boot disk is not the card, or the mounts are empty. Hold M, check Disk Drives. |
A finished card ships with firmware. A carrier you assembled yourself needs a UF2 on the Pico before any of the above can work.
The radio is 2.4 GHz WPA2. A 5 GHz-only network will not appear. A hidden SSID can be typed on the Wi-Fi page after a scan fails.
Wrong password is the usual miss. Passwords are case sensitive. F forgets the saved network so you can join again.
Ethernet with a link and an address skips Wi-Fi. Unplug the cable if you meant to test radio.
Join the network first. If Card Status says time is still syncing, wait. HTTPS waits on that clock.
If a2cogs.com is blocked on your LAN, set Image/Audio Source to a local share (Chapter 9). Browse then uses Your source. The hub may fall back to a plain list.
| What you see | What to do |
|---|---|
| No B on the row | That disk image is not a self-booting ProDOS volume. Mount it as data with a digit. |
| Boot starts, then hangs | Try another title. Confirm Card Status still has an address. |
| Same disk image on two drives | Clear one. The card will not mount a duplicate. |
| 8-bit machine, GS title | Use the 8-bit list, or a title marked 8b. |
| ProDOS 8 does not see a new drive | Restart from the CoGS slot. GS/OS sees live mounts. |
Wait for CoGS Config to appear, then open Browse Audio from there, not from a file CDA.
If play is choppy, System Speed was Normal. Play forces Fast for the session. After you stop, set Fast in the IIGS Control Panel if you want it to stay.
A program that owns the Ensoniq will cut off background play. Stop from the player first.
Delete COGS.CDA if both that file and CoGS
Config are in the menu.
This is expected for about ten seconds after the Finder appears, and the whole time you sit in the Desk Accessories menu. Go back to the desktop. Open the menu again.
If it never appears, the card is not being polled (wrong slot setting, or the machine never reached a desktop that talks to the slot). Boot a disk from the card so GS/OS sees the drives.
These are the lines you will see most often.
| Message | Meaning |
|---|---|
Wi-Fi connected with an
address |
Join succeeded. |
Time: syncing... (HTTPS waits on it) |
Clock is not set yet. Wait before Browse. |
Path: Ethernet (Wi-Fi is fallback) |
The cable is the live path. |
Not saved: that image is on drive n |
Duplicate mount refused. |
Not a bootable image |
Return on a data disk. Mount it with a digit. |
CoGS settings cleared |
Factory Reset finished. Firmware is unchanged. |
LL: ... = CARD IP! use another |
Marinetti and the card share one address. Change one of them. |
Your source moved |
The Mac’s address changed. Save the new URL. |
| Item | Specification |
|---|---|
| Host computers | Apple ][+, Apple //e, Apple IIGS. Any slot 1 to 7 |
| Processor | Raspberry Pi Pico 2 W (RP2350, 200 MHz, 520 KB SRAM, 4 MB flash) |
| Wi-Fi | 802.11n, 2.4 GHz, WPA2 |
| Ethernet | 10/100BASE-T, RJ45 (W5500) |
| Bus interface | Three 74LVC245 transceivers, sixteen I/O registers, slot and shared ROM |
| Update | Over the network from the card menu, or USB (UF2) |
| Item | Specification |
|---|---|
| Interface presented | SmartPort / ProDOS block device |
| Disk image formats | 2MG, ProDOS-order PO and HDV |
| Volume size | Up to 32 MB per disk image |
| Drives | Eight units. Four in slot 3, and four on an 8-bit host |
| Sources | a2cogs.com catalog, any HTTP(S) server with range requests, Image Manager |
| Item | Specification |
|---|---|
| Audio output | Ensoniq DOC through the IIGS audio output. Stereo with a stereo card |
| Audio formats | SoundSmith songs. PCM tracks. Internet radio decoded on the card |
| Tool sets | Tool 226 and Tool 219, supplied by the card |
| Picture viewer | Super Hi-Res 320 by 200, HGR 280 by 192, double hi-res 560 by 192 |
| Not shown | 3200-color stills |
CoGS is an open source, open hardware project. Firmware, card ROM, GS/OS software, and hardware design files are published at github.com/rperissi/cogs. Designed and developed by Rob Perissi.
The bus interface follows the A2Pico design: firmware library by Oliver Schmidt (MIT), hardware by Ralle Palaveev. The a2cogs catalog is built on the What is the Apple IIGS? collection and 4am’s Total Replay.
| Component | Author | License |
|---|---|---|
| Tool 219, SoundSmith player | Huibert Aalbers and FTA; v2.1 by Brutal Deluxe Software | Freeware, unmodified |
| Tool 226, PCM player | Derived from Petar Puskarich’s Tool225, on NinjaTracker Plus (Ninjaforce, Brutal Deluxe, FTA) | Used with permission |
| pico-sdk, lwIP, mbedTLS, minimp3 | Raspberry Pi, the lwIP project, Arm, Lion | BSD-3, BSD-3, Apache-2.0, CC0 |
Disk images in the a2cogs.com catalog are mirrored from public archives and identified by source in the Browse screen. Audio tracks carry their attributions in the audio catalog.